

Home › GCSE Art Help › How to Plan a GCSE Art Final Piece
Your GCSE Art final piece should not be a surprise that appears at the end of your project. It should be the clearest, most convincing result of everything you have investigated, recorded, tested and refined.
If you are wondering how to plan a GCSE Art final piece, begin by returning to your intentions—not by reaching immediately for your largest sheet of paper. Select the ideas and experiments that communicate those intentions most effectively, test several possible compositions or formats, solve practical problems at a smaller scale and then create a realistic production plan. This step-by-step guide shows you how.
What does AO4 mean in GCSE Art?
Assessment Objective 4 (AO4) asks you to present a personal and meaningful response that realises your intentions and demonstrates your understanding of visual language. In straightforward terms, your outcome should:
- grow logically from the investigation shown in your sketchbook or portfolio;
- communicate an idea, experience, atmosphere, message or purpose;
- show your own decisions rather than simply copying an artist;
- use appropriate imagery, composition, materials, techniques and presentation;
- bring together learning from AO1, AO2 and AO3.
The final piece is not separate from the creative journey. It is where the strongest parts of that journey come together.
AO4 is not awarded simply because a final piece is large, neat or time-consuming. Recent OCR moderation guidance, for example, emphasises the importance of presenting a cohesive and meaningful journey rather than relying on one isolated final piece. Always follow the current instructions supplied by your own school, college and examination board.
How to plan a GCSE Art final piece in eight steps
Step 1: Restate your intention
Before designing the outcome, write one or two sentences explaining what you want it to communicate. A broad theme such as Identity, Natural Forms or Reflections is not yet an intention. Your intention should show your particular direction.
| Too broad | More useful intention |
|---|---|
| My project is about identity. | I want to show how people present a confident public identity while concealing uncertainty. |
| My theme is natural forms. | I want to explore how damaged leaves can communicate fragility, change and renewal. |
| I am making a poster. | I want to create a poster that makes a community arts festival feel energetic, welcoming and local. |
Your intention can change as the project develops. If it has changed, say why. A thoughtful change supported by your research and experiments is stronger than following an early idea that no longer works.
Step 2: Select the strongest evidence from your project
Look through the whole project and identify the work that has the greatest potential. Do not automatically select the neatest page or most technically difficult experiment. Ask:
- Which first-hand drawings or photographs feel most personal?
- Which composition communicates my intention most clearly?
- Which experiment produced an unexpected but useful result?
- Which colours, marks, surfaces, typefaces, viewpoints or lighting choices suit the mood?
- Which work shows influence without imitating someone else?
- What should I leave behind because it no longer belongs in the project?
Make a small selection page or contact sheet that places your best possibilities together. Add short annotations explaining what you intend to retain, adapt, combine or reject.
Step 3: Use artist research without copying
Return to the artists, photographers and designers who genuinely influenced your project. Identify a principle you learned—not just an appearance you could copy. You might adapt an artist’s approach to scale, cropping, surface, repetition, symbolism, sequence, lighting or audience.
- Fine Art: look at how Georgia O’Keeffe used close cropping and scale, then test those principles with your own first-hand subject matter.
- Photography: explore how the Saul Leiter Foundation presents Leiter’s use of reflections, layers and partial views, then conduct your own shoot in a place that matters to you.
- Graphic Communication: examine original poster design in the London Transport Museum poster collection, focusing on hierarchy, simplification and the relationship between word and image.
For more help, use the Artist Analysis Worksheet and read How to Research Artists for GCSE Art.
Step 4: Generate several possible outcomes
Do not treat your first idea as the answer. Produce at least several genuinely different possibilities. These might change:
- composition and focal point;
- portrait, landscape, square or panoramic format;
- crop, viewpoint and amount of negative space;
- scale and proportion;
- single image, series, sequence or installation;
- materials, surface and construction;
- typographic hierarchy and image placement;
- colour, tone, lighting or atmosphere;
- how and where the audience encounters the work.
Small thumbnails are ideal because they allow you to think quickly. Try arrangements that are meaningfully different, not six versions of almost the same composition. Then annotate the alternatives: What works? What is unclear? Which best realises the intention—and why?
Step 5: Test the difficult parts before committing
A plan is not proof that an idea will work. Test the parts most likely to affect the result:
- a small colour or tonal study;
- a material sample or test panel;
- a photographic reshoot or alternative crop;
- a proof print;
- a paper, cardboard or digital mock-up;
- a typography and legibility test;
- a maquette for three-dimensional work;
- a trial sequence for photographs, animation or moving image;
- a photograph showing a proposed installation or display.
Record the result and act on it. “I like this” is not enough. A useful annotation identifies what the test revealed and names the next change: The darker background makes the pale seed head clearer, but the centre feels static. I will shift the main form off-centre and repeat smaller shapes across the lower edge.
Step 6: Make a workable production plan
Turn your selected idea into a practical plan. Record:
- the intended size, orientation and format;
- the materials, equipment, files or printing required;
- the order in which processes must happen;
- which stages need drying, fixing, exporting or testing time;
- how long each stage is likely to take;
- a simpler contingency if a process fails;
- how the finished work will be documented and presented.
If the work will be completed during a supervised period, follow your centre’s rules precisely. Test your workflow beforehand, but do not complete restricted stages in advance. Confirm what materials, preparatory work, files and equipment you are permitted to use.
Step 7: Keep making decisions while producing the outcome
A final plan should guide you, not prevent you from seeing. As you work, pause at sensible points and compare the developing outcome with your intention. If something is not communicating clearly, make a reasoned adjustment. Photograph important stages before they disappear, particularly when using layers, temporary arrangements, three-dimensional construction or digital editing.
Changing your mind is not failure when the change responds intelligently to what the work is showing you. Random last-minute changes, however, can weaken the connection between your preparation and outcome.
Step 8: Present and document the finished response
Make it easy for the moderator to understand the result. Photograph the whole outcome squarely and in even light. Add detail photographs where surface, scale, construction or technique matters. For a series, show the intended order. For an installation or three-dimensional response, include views that explain scale, location and the relationship between parts.
Presentation should support the work rather than decorate it. Elaborate borders, excessive mounting and unrelated embellishment do not earn marks by themselves.
GCSE Fine Art final-piece planning example
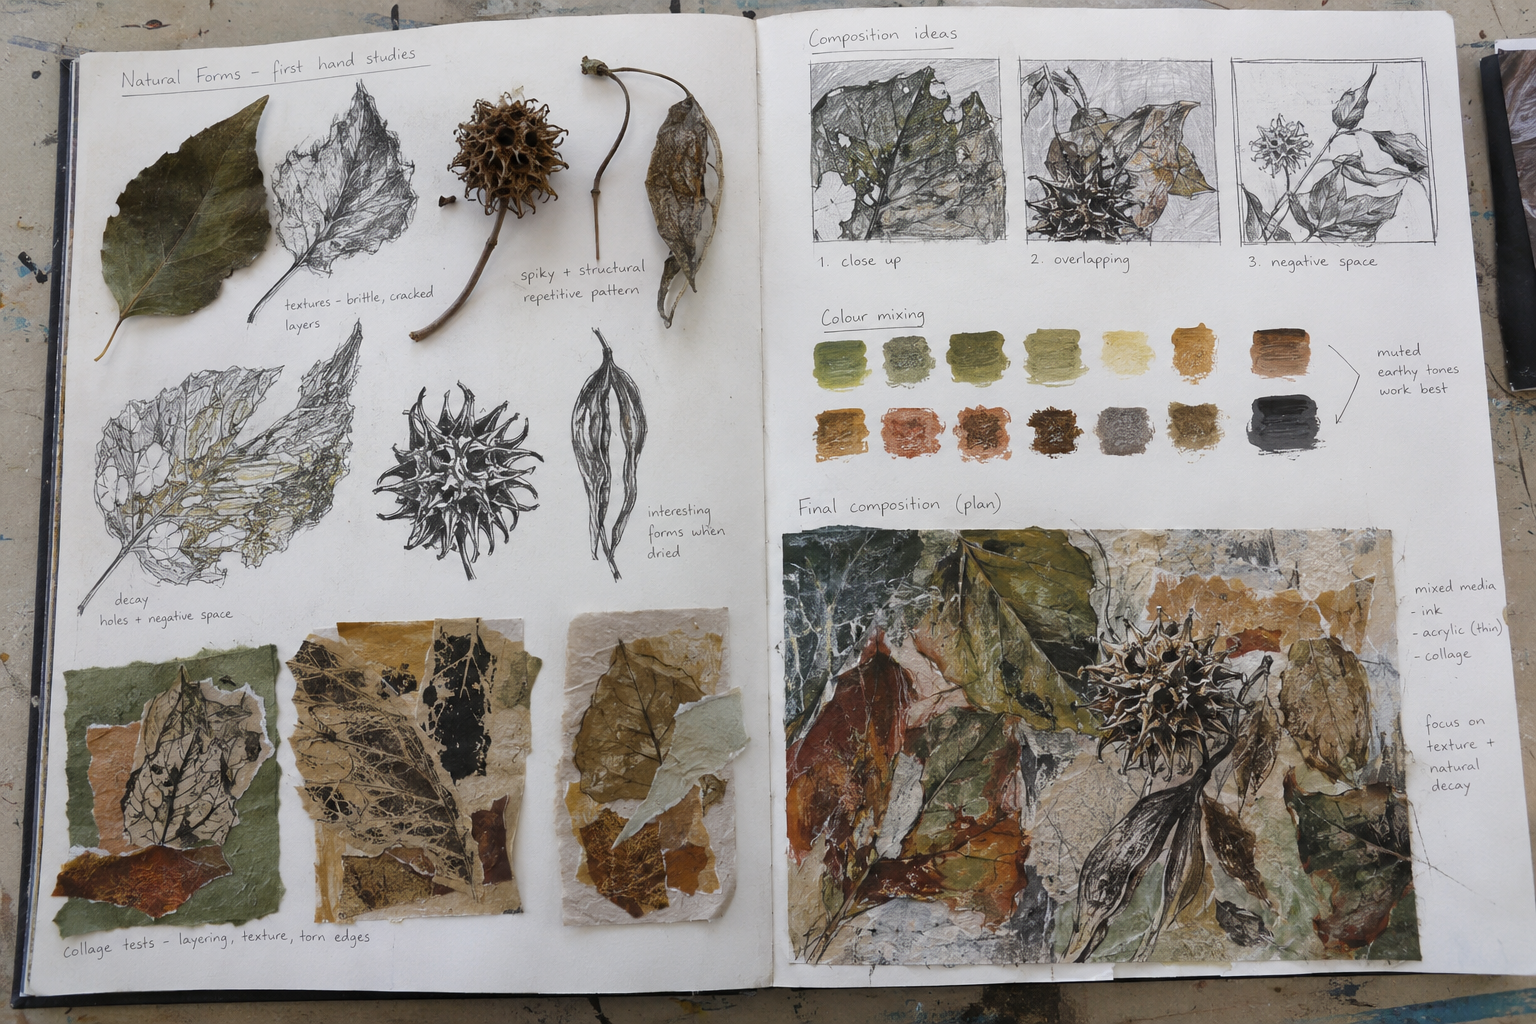
In this example, the student begins with first-hand studies of dried leaves and seed pods. The student selects qualities connected to natural decay: brittle edges, holes, repeated structures and muted earthy colours. Several compositions test close cropping, overlap and negative space. Colour trials and collage samples then inform a larger mixed-media plan.
The strength is not simply the finished design. The page makes the decisions visible: source → observation → experiment → comparison → selected direction. The outcome can now develop from evidence rather than guesswork. Students can find additional support in GCSE Art Experimentation Techniques and How to Improve Observational Drawing.
GCSE Photography final-series planning example
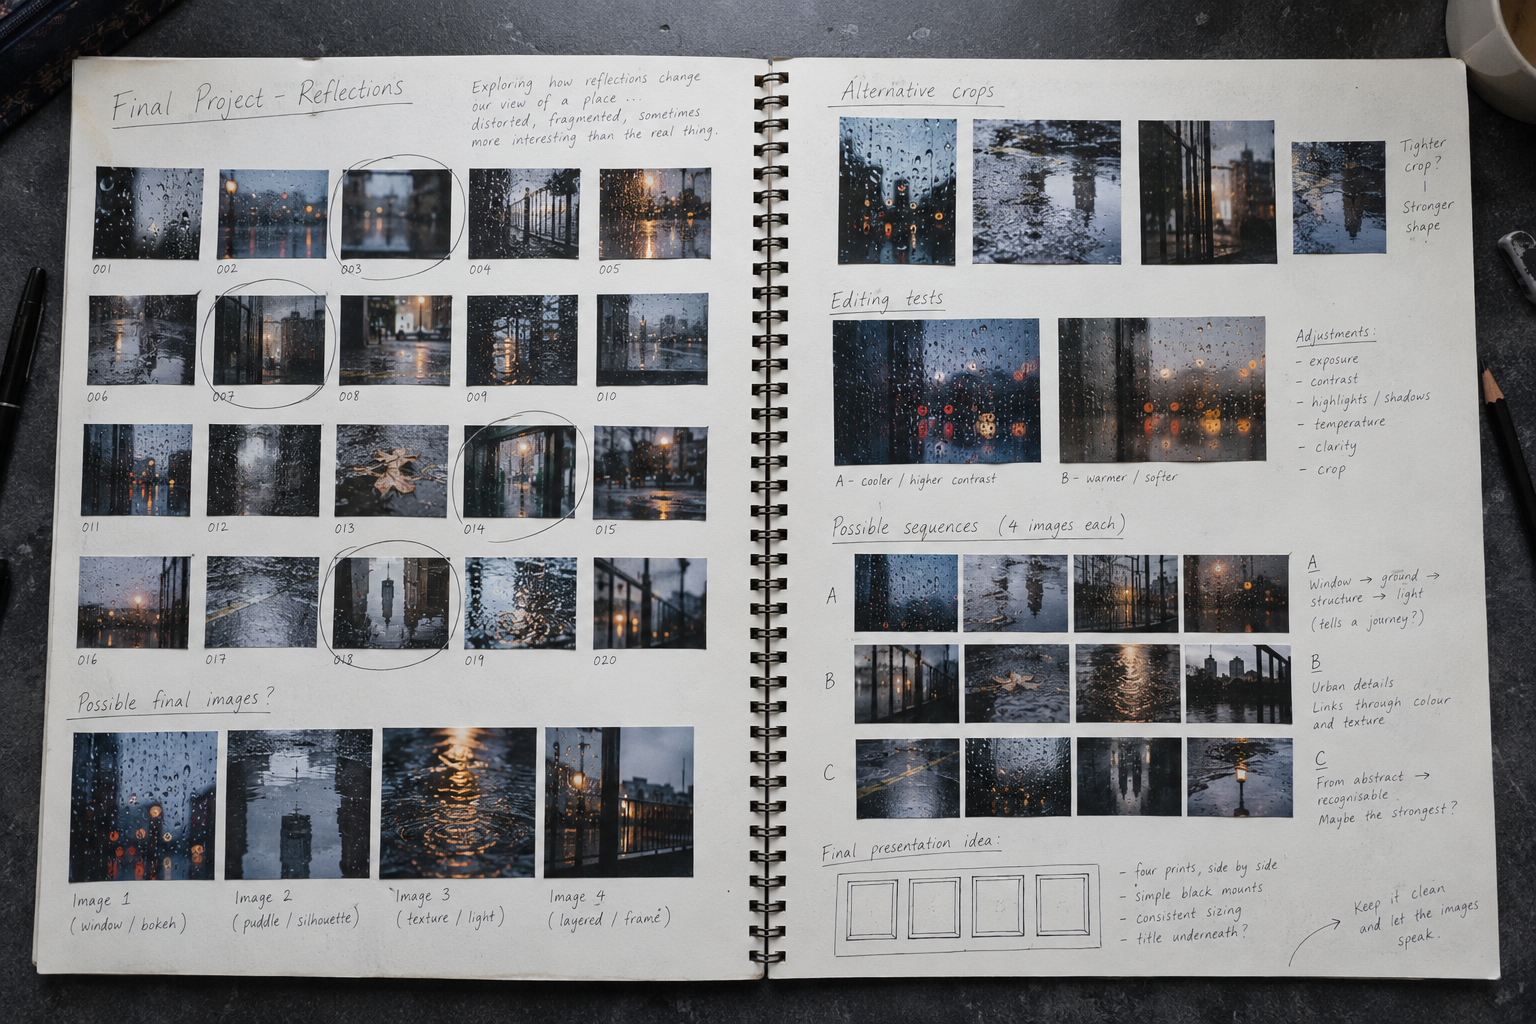
This Photography student explores how reflections fragment an ordinary urban journey. The contact sheet records a range of original images rather than one lucky photograph. The student identifies promising frames, compares alternative crops and editing choices, and tests different sequences before selecting four images.
A strong photographic outcome may be one image, a series, a book, a projection, a film or an installation. The format must suit the intention. Visit the GCSE Photography Course Guide and How to Develop Photography Contact Sheets for further guidance.
GCSE Graphic Communication final-outcome example

Here, the student is designing a visual identity and poster for a fictional community arts festival. Initial logo sketches are simplified and compared. Rough poster layouts test hierarchy, image, shape and typography. Colour trials and a folded leaflet mock-up show how the identity could work across more than one format.
The refined poster feels connected to the investigation because its imagery, colour and geometric forms have been developed visibly. It is not a professional agency solution—and it does not need to be. It is convincing GCSE evidence of a student testing, selecting and improving ideas. See the GCSE Graphic Communication Course Guide.
Weak and strong final-piece planning compared
| Limited planning | Stronger AO4 planning |
|---|---|
| The final piece appears suddenly. | The outcome can be traced through research, first-hand recording, experiments and refinement. |
| One small sketch is enlarged. | Several compositions or formats are compared before a direction is selected. |
| The student copies an artist’s image or style. | The student adapts relevant principles using original sources and personal decisions. |
| Materials are chosen because they are familiar. | Materials and processes are tested and selected because they support the intention. |
| The annotation describes what was done. | The annotation evaluates what changed, why it matters and what should happen next. |
| The outcome is mounted decoratively. | Scale, format, sequence and presentation help communicate meaning. |
| The plan is too ambitious for the available time. | The production plan is challenging but achievable, with a tested workflow. |
Common GCSE Art final-piece mistakes
- Starting the outcome before the strongest direction has been identified.
- Assuming that bigger automatically means better.
- Copying an artist too closely instead of transforming what was learned.
- Combining every previous experiment, even when some ideas do not belong together.
- Testing materials but never using the results to make decisions.
- Changing scale without checking whether the process still works.
- Leaving printing, drying, construction or exporting until the end.
- Producing several disconnected “final pieces” instead of one coherent response or series.
- Writing an explanation afterwards that claims connections the visual work does not show.
- Photographing the finished work poorly or failing to record temporary work.
GCSE Art final-piece planning checklist
- □ I can explain my intention in one or two precise sentences.
- □ My own drawings, photographs or observations give the outcome personal content.
- □ I have selected the strongest ideas rather than including everything.
- □ Artist research influences my decisions without being copied.
- □ I have compared several compositions, formats or sequences.
- □ I have tested the materials and processes that carry the greatest risk.
- □ I can explain what I retained, changed, combined and rejected.
- □ The scale and format suit the idea.
- □ I know which materials, equipment and files I require.
- □ My production plan fits the time available.
- □ I have a sensible contingency if a process fails.
- □ I know how the outcome will be presented and documented.
- □ The response connects visibly with AO1, AO2 and AO3.
- □ The finished work communicates my intention without needing a long explanation.
Teachers can also use the free Planning a Successful Final Outcome resource to structure discussion and preparation.
Frequently asked questions
Does a GCSE Art final piece have to be perfect?
No. Examiners are assessing how convincingly the response realises your intentions, not whether it looks commercially perfect. Appropriate control and resolution matter, but thoughtful, ambitious work can contain imperfections. A highly polished outcome may still be weak if it is disconnected from the project.
How many final pieces do I need?
There is no universal number that guarantees a grade. An outcome might be one object or image, or a coherent series, publication, film, installation or campaign. Follow your centre’s instructions and choose the form that best communicates your developed intention.
Can I change my final-piece plan?
Yes. A plan can change when testing or making reveals a better solution. Record what changed and explain the visual or practical reason. A purposeful adjustment shows judgement; an unexplained last-minute change may make the project feel disconnected.
Does my final piece have to be a drawing or painting?
No. GCSE Art & Design outcomes can take many appropriate forms, depending on the title and investigation—including photography, print, textiles, sculpture, installation, animation, moving image, digital design, packaging or a graphic campaign. Check the requirements for your course title and centre.
Will elaborate mounting improve my AO4 mark?
Not by itself. Mounting and presentation are useful when they strengthen meaning, hierarchy, sequence or the viewer’s experience. Decorative borders and excessive presentation cannot compensate for limited development or an unresolved outcome.
What happens if I do not finish the final piece?
An unfinished response may limit the evidence that your intentions were realised, but the complete project is still assessed. Present the work clearly, retain meaningful development evidence and explain decisions honestly. Do not disguise unfinished areas with unrelated decoration. Better planning and timed tests can reduce this risk.
Can I use AI when planning my GCSE Art final piece?
Your own ideas, sources, decisions and practical development must remain clear, and your school must be able to authenticate the work as yours. Rules and centre policies can change, so ask your teacher before using generative tools. Read Can I Use AI Image Generation in GCSE or A Level Art? for a fuller discussion.
How much preparation can I complete before the supervised session?
Only complete work permitted by your current specification and centre instructions. Your teacher should explain which preparatory materials, files, objects and equipment may be taken into the supervised period and which parts of the response must be produced under supervision. Never rely on general online advice instead of your centre’s rules.
The key message
A strong GCSE Art final piece feels earned. It brings together the most relevant discoveries from the project and communicates them through purposeful choices about imagery, composition, materials, scale, format and presentation. The goal is not to make the biggest or most elaborate piece possible. It is to create the response that most convincingly belongs to your investigation.
Would an independent portfolio review help?
If you are unsure which idea has the greatest potential—or whether your planned outcome connects strongly enough with AO1–AO4—Portfolio to A Star can provide practical, personalised guidance based on the evidence visible in your work.
Continue improving your GCSE Art portfolio
- GCSE Art AO1 explained: research and developing ideas
- GCSE Art AO2 explained: experimentation and refinement
- GCSE Art AO3 explained: recording and annotation
- GCSE Art AO4 explained: personal response and outcome
- How to achieve your best possible GCSE Art grade
- How to present your Art sketchbook
Official specification sources
Requirements and administrative arrangements can change. Students should always follow their centre’s current instructions. Teachers and students can consult the official AQA GCSE Art and Design specification, Pearson Edexcel GCSE Art and Design qualification page, OCR GCSE Art and Design qualification page and Eduqas GCSE Art and Design qualification page.
No responses yet