
A Grade 9 portfolio does not have to look perfect from the first page. It needs to show an ambitious, thoughtful journey in which you investigate, experiment, make decisions, improve your ideas and produce a personal response.
This guide brings together the shared expectations of AQA, Pearson Edexcel, OCR and WJEC Eduqas. It applies to GCSE Fine Art, Photography and Graphic Communication, which some schools call Graphic Design. Always follow the exact instructions and deadlines given by your own teacher and awarding body.
Aim high, stay curious and make every page show what you discovered, decided or improved.
First, Understand How Your Work Is Assessed – Grade 9 Advice
All four awarding bodies organise assessment around four Assessment Objectives. Each objective contributes 25% of the available marks. Courses are normally divided into a portfolio or personal coursework component worth 60% and an externally set component worth 40%.
Your school may organise projects differently, but the central message is consistent: a strong result comes from the quality of the complete creative process, not from one impressive final piece.
| Awarding body | Relevant titles | Typical component balance | What this means for you |
|---|---|---|---|
| AQA | Fine Art, Graphic Communication and Photography | Portfolio 60%; externally set assignment 40% | Build purposeful investigations, refine thoughtfully, record ideas clearly and resolve a personal response. |
| Pearson Edexcel | Fine Art, Graphic Communication and Photography | Personal Portfolio 60%; externally set assignment 40% | Make sure the evidence across each component shows all four objectives working together. |
| OCR | Fine Art, Graphic Communication and Photography | Portfolio 60%; externally set task 40% | Develop a coherent body of work. A meaningful response is shown through the whole journey, not only the outcome. |
| WJEC Eduqas | Fine Art, Graphic Communication and Photography | Portfolio 60%; externally set assignment 40% | Connect research, recording, experimentation and refinement through a personal creative process. |
Important: grade boundaries can change from year to year. There is no single number of pages, artists, photographs or experiments that automatically earns a Grade 9. Your goal is to provide convincing evidence across all four objectives.
Grade 9 Advice – The Four Assessment Objectives in Student-Friendly Language
| Objective | What you need to show | A useful question to ask yourself |
|---|---|---|
| AO1: Develop | Investigate relevant artists, photographers, designers, cultures and other sources. Use what you learn to develop your own ideas. | How has this source changed the direction of my work? |
| AO2: Refine | Experiment with materials, techniques and processes. Compare results, select promising ideas and improve them. | What worked best, why, and what will I change next? |
| AO3: Record | Record observations and ideas through drawings, photographs, notes, studies, layouts, contact sheets and other relevant methods. | Is my recording purposeful, accurate and connected to my intention? |
| AO4: Present | Create a personal and meaningful response that connects clearly to your investigation and shows confident use of visual language. | Can someone trace how my outcome grew from the work before it? |
Do not treat the objectives as four isolated chapters. A photograph you take, analyse, edit and use in a final layout can contribute to several objectives at once. The strongest portfolios weave the objectives together naturally.
An integrated creative journey
The Assessment Objectives are strongest when they operate as one connected creative journey.
What Grade 9 Work Usually Does Well
- Begins with a personal question or genuine interest. The student has a reason for choosing the subject beyond simply following a class task.
- Uses first-hand sources. Original photographs, drawings, observations, collected materials, interviews or location studies create individual evidence.
- Researches selectively. Artists, photographers and designers are chosen because their ideas or methods can help the project move forward.
- Experiments with a purpose. Tests answer a question about mood, meaning, composition, material, technique, audience or communication.
- Makes decisions visible. Strong work compares possibilities, identifies successful features and explains the next step.
- Returns and improves. Reshooting, redrawing, re-editing and redesigning are signs of ambition, not signs of failure.
- Shows increasing control. Technical choices become more deliberate as the project develops.
- Connects the outcome to the journey. The final response brings together discoveries made throughout the project.
A Simple Grade 9 Working Cycle
Explore → Analyse → Experiment → Reflect → Improve → Resolve
You can repeat this cycle several times. Each repetition should make your intention clearer and your choices more confident.
Ten Habits That Strengthen Every Portfolio – Grade 9 Advice
1. Turn the Theme into Your Own Question
A broad theme becomes more manageable when you turn it into a question. Instead of exploring “Identity” in general, you might investigate how clothing communicates belonging, how family objects hold memories or how online identities differ from private ones. A focused question gives your research and experiments a purpose.
2. Collect Strong First-Hand Evidence
Take your own photographs, draw from observation, visit a location, collect textures, record lighting, interview a subject or document an event. First-hand evidence makes your work distinctive and gives you material that nobody else in the class will have.
3. Make Contextual Research Work for You
A biography copied from a website will not develop your project. Identify a precise feature in the work: perhaps cropping, surface, colour, sequencing, symbolism, lighting, type hierarchy or negative space. Test that feature in your own work, evaluate the result and decide whether to keep, change or reject it.
4. Give Every Experiment a Question
Before making a test, write down what you want to discover. For example: “Will a restricted palette create a quieter mood?”, “Can motion blur communicate the rush of the station?” or “Which type treatment is most legible to a teenage audience?” This turns experimentation into purposeful investigation.
5. Compare, Select and Reject
Place variations side by side and judge them against your intention. Circle or label the strongest result, but also explain what you learned from weaker attempts. An unsuccessful test can be valuable evidence when it leads to a better decision.
6. Annotate Decisions, Not Just Actions
“I used acrylic paint” only names an action. Stronger annotation explains the intention, result and next step: “The opaque acrylic made the figure feel solid, but the flat background reduced the sense of distance. Next I will glaze cooler colour over the background and soften its edges.”
7. Revisit Your Best Possibilities
Do not move on as soon as something works. Ask how it could become more personal, more controlled or more appropriate to the intended meaning. Develop the strongest possibility at different scales, with alternative compositions or through another process.
8. Show Technical Growth
Early uncertainty is acceptable when later evidence shows learning. Keep the tests that explain how you improved your control of paint, focus, exposure, editing, printmaking, typography, layout or presentation.
9. Plan the Outcome Before the Timed Session
Test composition, scale, materials, lighting, sequencing, typography and practical timings in advance. Your plan should be secure enough to guide you but flexible enough to respond to discoveries made while working.
10. Edit the Portfolio as a Clear Story
Check that important turning points are easy to find. Remove unnecessary repetition only with your teacher’s guidance, fill genuine evidence gaps and make sure photographs of work are clear. Presentation should help the examiner understand your journey without hiding its authentic development.
How to Aim for Grade 9 in Fine Art
Fine Art can include drawing, painting, printmaking, sculpture, lens-based work, digital processes, mixed media and installation. You do not need to use everything. Choose methods that strengthen your intention and allow you to demonstrate increasing control.
- Draw and photograph your own subjects from more than one angle, distance and lighting condition.
- Explore formal elements such as line, tone, colour, texture, shape, form, space, scale and composition.
- Study how relevant artists construct meaning, not simply what their work looks like.
- Test surfaces, grounds, tools and combinations of media with a clear purpose.
- Use sketches and studies to solve specific problems before beginning a larger piece.
- Compare material qualities: control against spontaneity, transparency against opacity, detail against simplification or smoothness against texture.
- Let the outcome develop from your strongest discoveries instead of deciding it at the beginning and forcing every page to lead towards it.
Fine Art Example of Good Practice
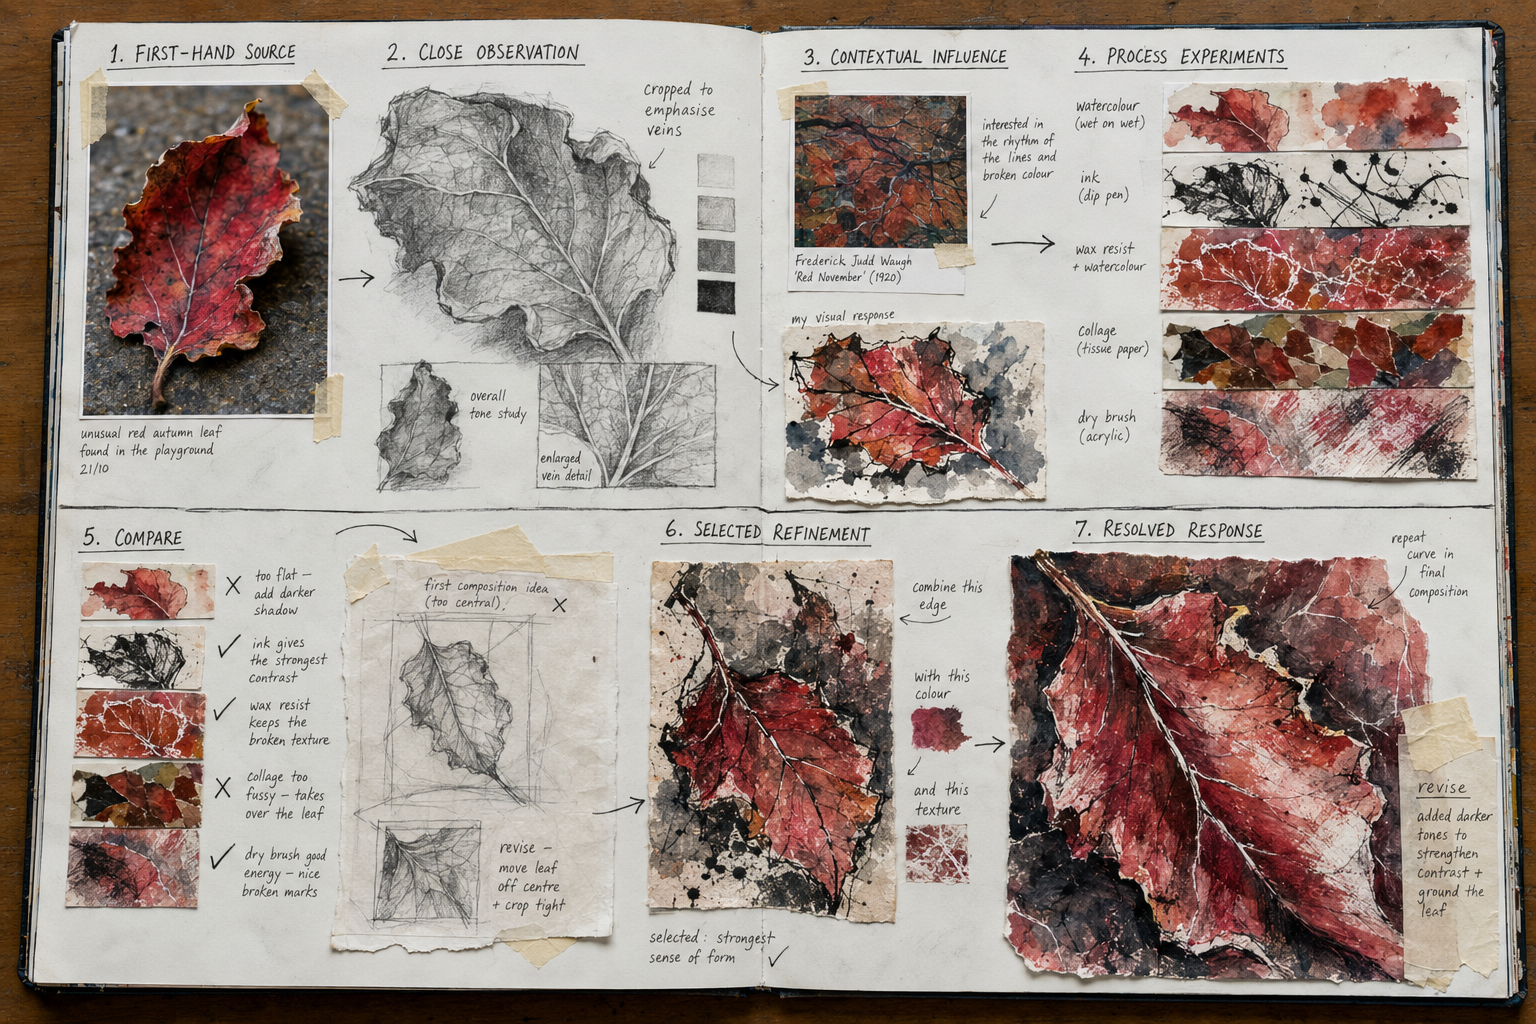
A student exploring “Weathered” photographs cracked walls, rusted metal and peeling posters in their local area. They make close observational drawings, then study how two artists use layered surfaces and fragmented composition. Rather than copying either artist, the student tests sanding, translucent glazes, printed fragments and stitched paper using their own photographs. They compare the results, select the combination that best suggests accumulated time, refine the colour balance and create a larger mixed-media response. The final work is personal because its subject, visual evidence and decisions all belong to the student.
Fine Art
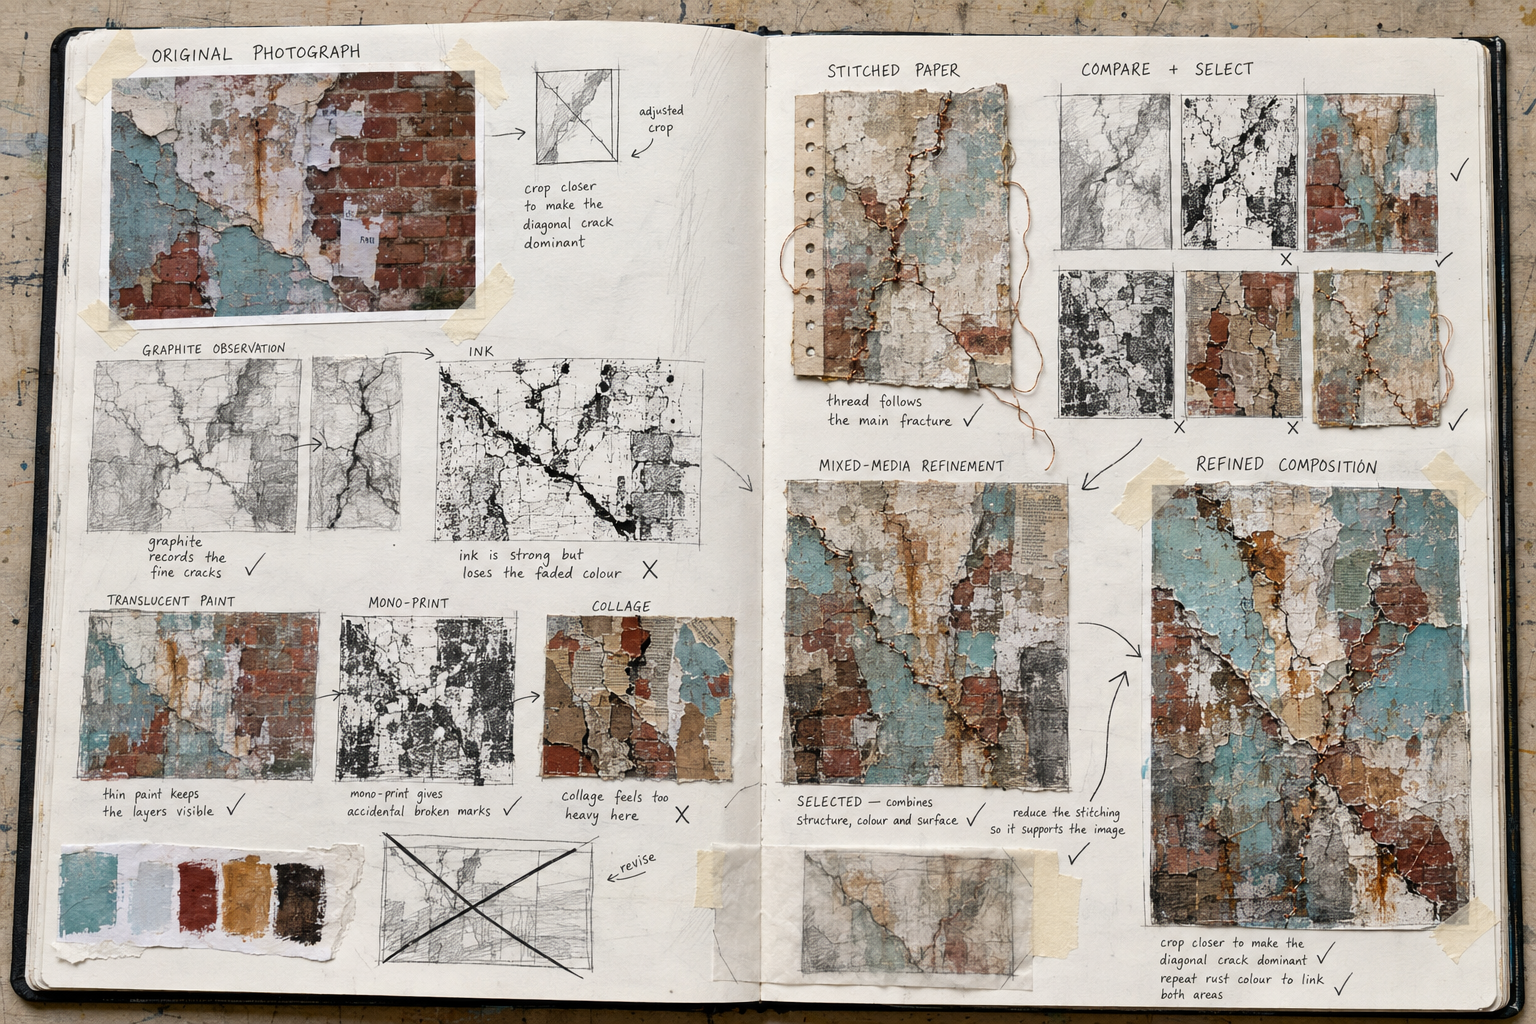
Strong Fine Art development connects first-hand observation, contextual influence, material testing and personal refinement.
Grade 9 Advice – How to Aim for Grade 9 in Photography
High-level Photography is about intentional image-making, not simply collecting attractive photographs. Show how technical, visual and editing choices help you communicate an idea.
- Write a clear intention before each shoot and plan subject, location, viewpoint, light and equipment.
- Create contact sheets that show genuine exploration, then identify and explain your strongest frames.
- Control focus, depth of field, shutter speed, ISO, exposure, white balance, lighting and composition where relevant.
- Learn from other photographers by testing a method or visual strategy with your own subject matter.
- Reshoot after evaluation. A second or third focused shoot often shows more development than one very large first shoot.
- Present editing stages and compare alternatives. Explain why the selected edit supports your intention.
- Consider sequence, scale, crop, paper, projection, installation, book or screen presentation.
- Respect privacy, consent, copyright and the truthful representation of subjects. Record your own sources and credit any permitted external material.
Photography Example of Good Practice
A student investigating “Urban Isolation” begins with a daytime shoot at a busy underpass. On the contact sheet, they notice that high viewpoints and empty space make the figures seem more isolated. They research photographers who use scale, geometry and artificial light, then plan a second shoot at dusk from carefully selected positions. They test fast and slow shutter speeds, compare warm and cool edits and select a restrained sequence of images. A final reshoot corrects distracting backgrounds and makes the visual rhythm more consistent. The finished series feels resolved because each technical decision supports the central idea.
Photography
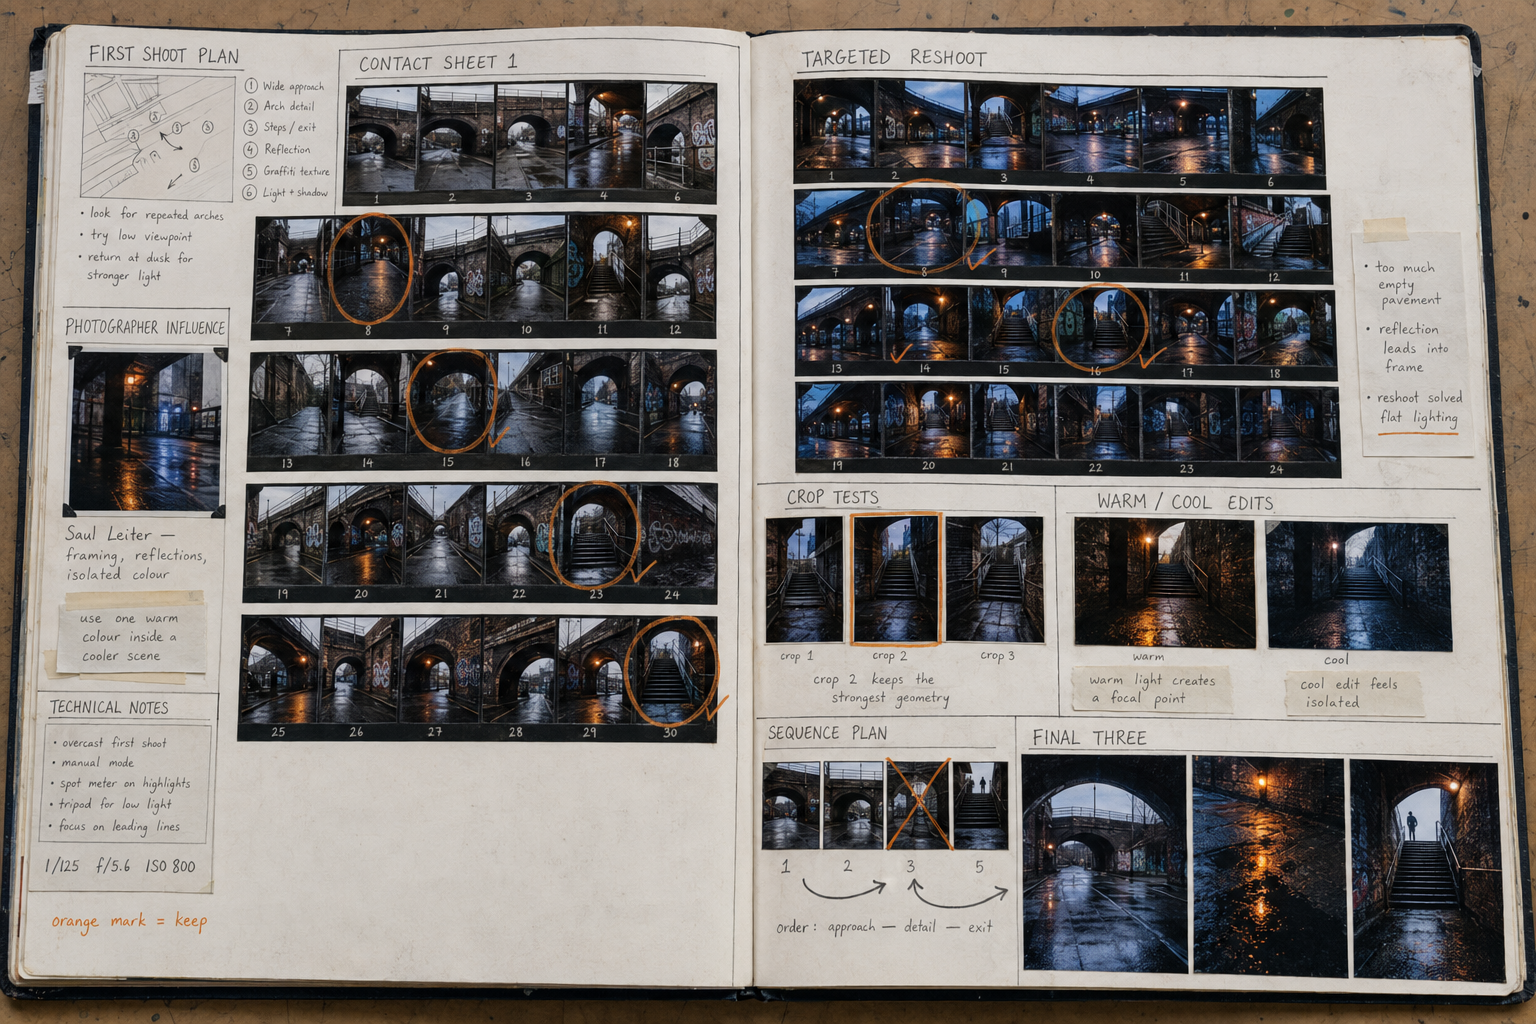
Reshooting turns evaluation into visible photographic development.
Grade 9 Advice – How to Aim for Grade 9 in Graphic Communication
Graphic Communication is sometimes described informally as Graphic Design. It can include branding, advertising, illustration, packaging, publishing, information design, typography, interactive media and motion graphics. Successful work communicates clearly to a defined audience while showing a distinctive visual voice.
- Begin with a specific brief: define the message, purpose, audience, format and practical constraints.
- Gather original imagery, lettering, textures and observations rather than depending on found internet material.
- Analyse how designers use hierarchy, grid, type, image, colour, negative space, scale and visual metaphor.
- Generate many small thumbnail ideas before committing to one layout.
- Develop concepts using suitable physical and digital processes, such as collage, printmaking, photography, drawing, vector design and image editing.
- Test legibility at the actual viewing size and distance. Check spelling, alignment, contrast, margins and image quality.
- Ask people in the target audience for focused feedback, then show what you changed in response.
- Present the selected design in an appropriate mock-up or system, while keeping the assessed design itself easy to inspect.
- Use your own or properly licensed assets, keep source records and credit any material you are permitted to use.
Graphic Communication Example of Good Practice
A student receives a brief for a youth theatre production of a mystery play. They photograph dramatic shadows and make hand-cut letterforms from their own drawings. After analysing how relevant poster designers control hierarchy and suspense, they produce quick thumbnails and test collage, lino print, photographic montage and vector approaches using the same wording. Feedback shows that one expressive layout has atmosphere but weak date information. The student combines its textured image with a clearer type system, tests the poster at A3 and phone-screen size, refines spacing and presents a coordinated poster and social-media version. The result is visually engaging and appropriate for its audience.
Graphic Communication
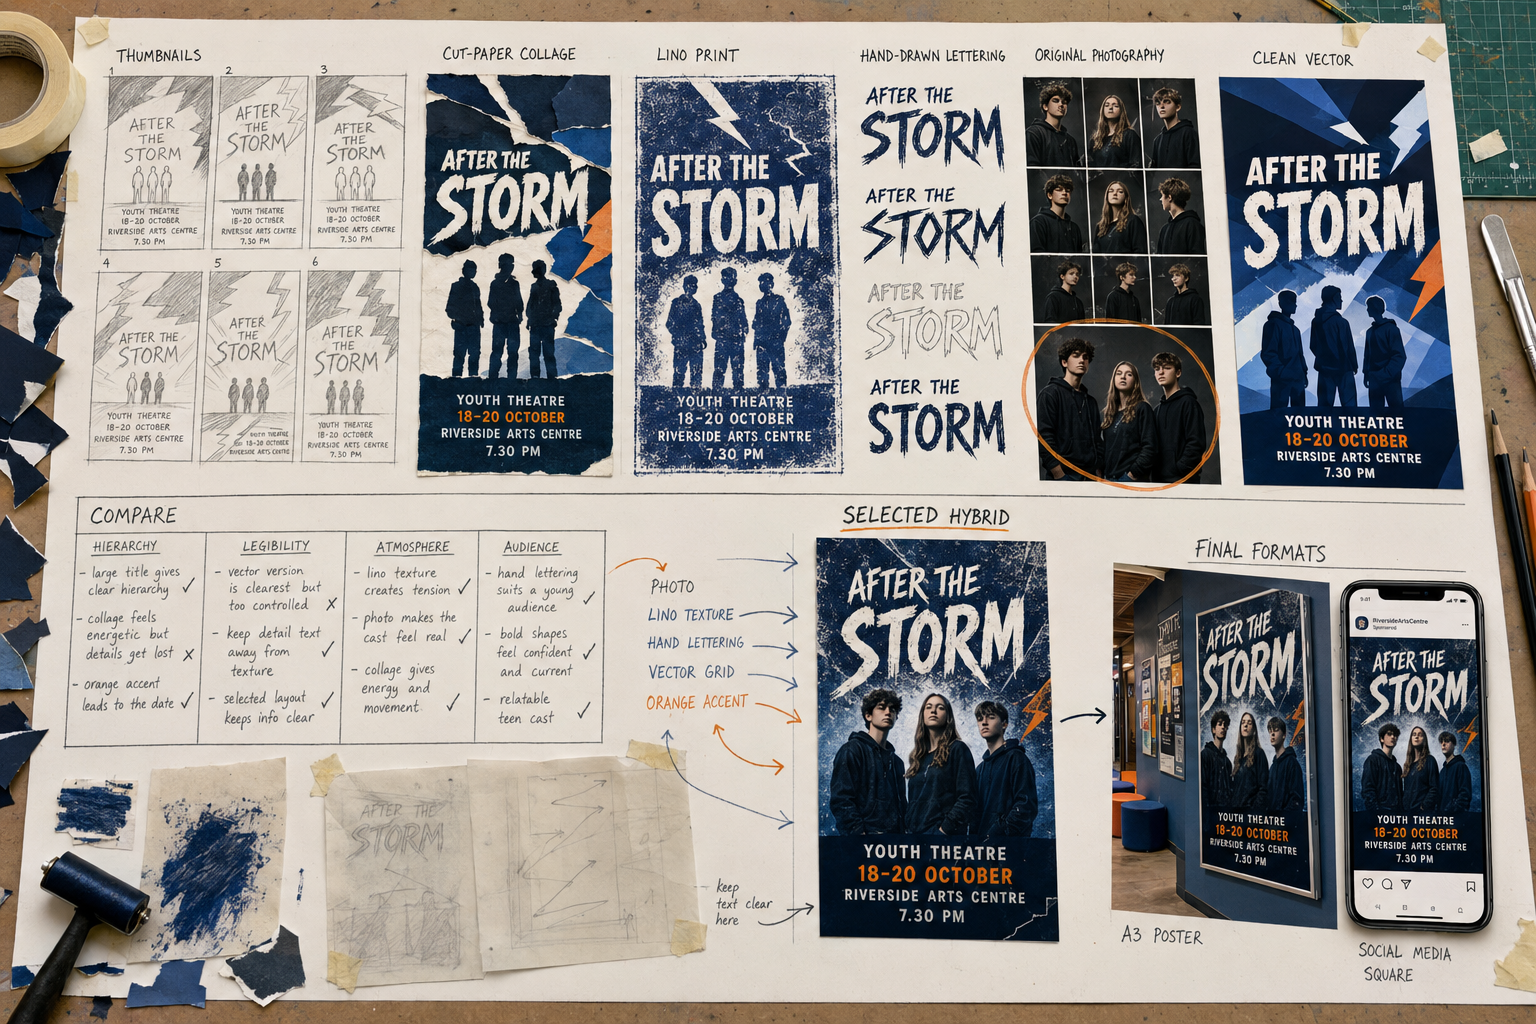
Effective Graphic Communication balances an original visual idea with clarity for a defined audience.
A Strong Formula for Annotation
Useful annotation can be concise. Use this five-part structure whenever you evaluate a meaningful test:
- Intention: What were you trying to communicate or discover?
- Action: What did you change, test or control?
- Result: What visual or technical effect did it create?
- Judgement: How well did it support your intention?
- Next step: What will you keep, alter, combine or reject?
Fine Art Annotation Example
“I wanted the surface to suggest fragile memories. Scraping through the pale glaze revealed darker layers and created an aged texture. The effect is strongest around the object, but the top corner is too busy. I will keep the layered process and simplify the surrounding marks in my next study.”
Photography Annotation Example
“I used a slow shutter speed to contrast the still figure with commuters in motion. The blur communicates pressure, although the bright sign pulls attention away from the subject. I will return at dusk, change my viewpoint and expose for the sign before repeating the shot.”
Graphic Communication Annotation Example
“The uneven hand-cut title creates the tense atmosphere I wanted, but the performance date becomes difficult to read at phone size. I will retain the expressive title, use a simpler supporting typeface and increase the spacing around the booking information.”
Grade 9 Advice – Turn Common Weaknesses into Strengths
| Starting point | A stronger Grade 9 habit |
|---|---|
| A long artist biography | Analyse one or two relevant choices, test them and explain their effect on your own work. |
| Many unrelated material samples | Use the same source or problem so that the tests can be compared fairly. |
| One Photography shoot | Evaluate, plan and complete a focused reshoot that responds to what you learned. |
| One polished graphic layout | Show thumbnails, variations, feedback, selection and refinement before the final design. |
| Descriptions of what you did | Explain intention, effect, judgement and next step. |
| Only showing successful work | Include useful risks and show how discoveries from them led to better decisions. |
| A final piece unrelated to earlier pages | Make the outcome visibly combine ideas, sources and processes developed during the project. |
| Decorative sketchbook pages | Prioritise clear evidence and authentic thinking; use presentation to support the work. |
| Following an artist too closely | Extract a principle or method and transform it through your own subject and intention. |
| Rushing the timed outcome | Practise difficult stages and plan materials, files, timings and presentation in advance. |
Image suggestion: purposeful development
Image brief: A side-by-side comparison of two believable GCSE Art and Design development spreads. The first has disconnected samples labelled only with process names. The second uses one source and intention, compares purposeful variations, identifies a strongest result, explains a rejected option and shows a refined next step. Use restrained labels and no grades or numerical marks.
Suggested caption: Purposeful comparison and refinement make experimentation meaningful.
Alt text: Comparison between disconnected GCSE experiments and a stronger sequence of purposeful tests, evaluation and refinement.
Grade 9 Portfolio Checklist
Use this table throughout a project, not only at the end. You do not need identical evidence in every discipline, but you should be able to show the thinking behind your choices.
| Check | Fine Art evidence | Photography evidence | Graphic Communication evidence | Main AO |
|---|---|---|---|---|
| My theme has a personal focus | A focused question, subject or experience | A clear photographic intention | A defined brief, message and audience | AO1 |
| I have strong first-hand sources | Observational drawings, photographs, objects or location studies | Original shoots and contact sheets | Original images, lettering, textures, interviews or observations | AO3 |
| My contextual sources are relevant | Artists selected for ideas, materials or visual language | Photographers selected for approach and technique | Designers selected for communication methods | AO1 |
| I explain how sources influence me | Visible tests and transformed ideas | Technique or strategy tested in an original shoot | Hierarchy, grid, type or imagery explored in new designs | AO1 |
| My experiments answer questions | Material, surface, scale and composition tests | Camera, lighting, viewpoint and editing tests | Thumbnail, typography, image and layout tests | AO2 |
| I compare variations fairly | The same subject or intention is retained | The same location, subject or visual problem is explored | The same brief and content are tested | AO2 |
| I identify strengths and weaknesses | Evaluative notes beside studies | Selections marked and justified on contact sheets | Options judged for audience, clarity and impact | AO2 |
| I show a clear next step | A selected process is refined | Evaluation leads to a planned reshoot | Feedback or testing leads to a revised design | AO2 |
| My recording supports my intention | Accurate or expressive studies relevant to the project | Controlled images and documented shoot decisions | Clear visual research, notes, diagrams and layouts | AO3 |
| My technical control improves | More confident handling of chosen media | More deliberate exposure, focus, light and editing | Improved typography, alignment, image quality and production | AO2/AO3 |
| I take creative risks | Unfamiliar scale, process or combination tested thoughtfully | Alternative viewpoint, movement, lighting or presentation explored | Contrasting visual routes or processes explored | AO2 |
| I learn from unsuccessful tests | A change is made because of the result | A technical or compositional issue is corrected | A weak idea is revised or rejected with a reason | AO2 |
| My annotation is concise and useful | Intention, effect, judgement and next step | Technical choice connected to meaning | Design choice connected to audience and purpose | AO1/AO2/AO3 |
| My outcome is prepared carefully | Composition, scale, surface and material trials | Final shoot, edit, sequence and presentation tests | Final dimensions, formats, proofing and mock-ups | AO4 |
| My response is personal | Own subject, interpretation and visual decisions | Own viewpoint, visual story and selected sequence | Own concept, assets and communication solution | AO4 |
| The outcome connects to development | Earlier discoveries are visible in the final work | Research and reshoots explain the final series | Thumbnails and tests explain the final design system | AO4 |
| My presentation supports the work | Clear, secure and appropriate display | Consistent print, screen, book, sequence or installation choices | Clean final artwork shown at relevant sizes or in context | AO4 |
| My sources are responsible | Artists and external images are credited | Consent, privacy and image sources are considered | Assets are original, licensed or credited as required | All |
| I have checked the whole component | All four objectives are convincingly evidenced, important decisions are easy to follow and unfinished gaps have been discussed with my teacher. | All | ||
A Final Project Audit
- Can I explain my central idea in one or two sentences?
- Is my own first-hand evidence easy to identify?
- Does each contextual source have a clear purpose?
- Have I shown comparison, selection and refinement rather than simple repetition?
- Does my annotation explain decisions and next steps?
- Can I point to at least one important improvement after feedback or evaluation?
- Have I documented temporary, digital, three-dimensional or large-scale work clearly?
- Does the final response connect visibly to the journey?
- Have I checked spelling, file quality, print quality, mounting and presentation?
- Have I followed my teacher’s submission instructions and deadlines?
Frequently Asked Questions
Do I have to draw or paint realistically to achieve a Grade 9?
No. Observational skill can be valuable, especially in Fine Art, but assessment is broader than realism. You can achieve highly through expressive, abstract, conceptual, digital, photographic, typographic or mixed-media work when your investigation, recording, refinement and response are convincing.
How many artists, photographers or designers should I study?
There is no universal number that guarantees a grade. A smaller group of well-chosen sources used thoughtfully is more useful than many superficial pages. Follow your teacher’s guidance and show how each source changes your work.
Does my final piece decide my grade?
No. The final response matters, but it is assessed as part of a complete component. Investigation, experimentation, recording, refinement and the connections between them all contribute to the result.
Must every experiment be successful?
No. Thoughtful risk-taking can strengthen a project. Keep evidence of a less successful test when you can explain what it taught you and how it led to a better choice.
How much should I write?
Write enough to make your thinking clear. Short, specific evaluation is usually more effective than long description. Connect visual or technical choices to intention, meaning, audience and next steps.
Can digital work achieve a Grade 9?
Yes. Digital and physical processes can both provide excellent evidence. Show your sources, stages, alternatives and decisions rather than presenting only a finished digital file.
Helpful Official and Student Resources
The descriptions on this page are original summaries of public guidance. They do not reproduce awarding-body mark schemes. Use the official pages below to check the specification for your course.
Official Awarding-Body Guidance
- AQA GCSE Art and Design: scheme of assessment
- AQA GCSE Art and Design: subject skills
- Pearson Edexcel GCSE Art and Design specification
- OCR GCSE Art and Design specification
- OCR GCSE Art and Design assessment grid
- WJEC Eduqas GCSE Art and Design specification
- WJEC Eduqas GCSE Art and Design teaching guide
Ideas, Context and Exemplars
- Tate Coursework Guides offer starting points for themes, artists and visual ideas using Tate’s collection.
- V&A resources for secondary schools and colleges can support research into art, design, photography, fashion, objects and visual culture.
- Student Art Guide sketchbook ideas provide varied examples of how students organise and develop visual thinking.
- The Art Teacher Grade 9 GCSE Art examples can help you notice how high-level portfolios combine research, experiments, planning and outcomes.
- Save My Exams: an introduction to GCSE Art and Design gives a broad overview of the course and sketchbook process.
Use online examples to understand good practice, never to imitate somebody else’s project. Your strongest advantage is the combination of your own subject matter, observations, choices and visual voice.
Your Grade 9 Mindset
Aim for evidence of growth rather than instant perfection. Be brave enough to test an idea, honest enough to evaluate it and determined enough to improve it. A coherent, personal portfolio grows from many thoughtful decisions—and each new decision is an opportunity to raise the quality of your work.
This guidance is designed to support students and does not guarantee a particular grade. Assessment decisions are made by schools and awarding bodies using the current specification and moderation arrangements.