
An A* in A Level Art is demanding, but it is not mysterious. The strongest portfolios usually show an ambitious personal enquiry, intelligent connections with relevant sources, purposeful experimentation, perceptive recording and a resolved outcome that has grown naturally from the work that came before it. This guide explains how Fine Art, Photography and Graphic Communication students can give themselves the best possible chance of reaching that standard.
New to Portfolio to A Star? Begin at the home page, or visit the A Level Art advice hub for course guidance, Assessment Objective explanations and further resources.
First, an honest answer
No website, teacher or checklist can guarantee an A*. Grade boundaries can change, and your work is judged against the assessment criteria used by your examination board. What you can control is the quality, relevance and consistency of the evidence you produce. Aim to make every investigation useful, every experiment purposeful and every decision visible.
How to get an A* in A Level Art – What does A* quality usually look like?
At A Level, technical skill matters, but skill alone is not enough. A highly polished final piece cannot compensate fully for thin research, disconnected experiments or weak recording. The four Assessment Objectives work together and, in the standard A Level Art and Design model, are equally important. Your portfolio should therefore read as one connected creative journey rather than four separate chapters labelled AO1, AO2, AO3 and AO4. That’s why we offer this A Level Art A* advice.
- Personal: the project reveals your interests, experiences, opinions or way of seeing.
- Sustained: ideas are revisited, questioned and developed over time.
- Selective: you choose the most useful sources, images, processes and outcomes instead of including everything.
- Critical: you explain what you discovered, evaluate results and use that judgement to decide what happens next.
- Connected: research, first-hand recording, experiments and final intentions visibly influence one another.
- Independent: the work goes beyond a teacher-led exercise and develops a recognisable direction of its own.
- Resolved: the final response is ambitious but achievable, technically controlled and appropriate to its purpose.
A useful test: cover the annotations and look only at the visual evidence. Can someone see how your idea changed, which discoveries mattered and why your final decisions were made? Then cover the images and read only the annotation. Does it analyse, evaluate and direct the next step? Strong portfolios communicate through both.
AO1: Develop a sustained and informed enquiry
AO1 is about developing ideas through focused investigation and showing analytical understanding of relevant contextual sources. It is not an invitation to fill pages with copied biographies. Use artists, photographers, designers, movements, places, objects, writing, music or social contexts because they help you ask better questions and make better work.
How to get an A* in A Level Art – How to strengthen AO1
- Begin with a question, tension or idea rather than a single object: for example, “How does a familiar place hold memory?” is richer than simply “buildings”.
- Investigate a small number of sources in depth. Compare their intentions, visual language, methods, context and the effect of their decisions.
- Respond practically. Test a crop, lighting method, surface, colour structure, composition or typographic principle inspired by your research without copying the finished work.
- Show how one investigation leads to another. Use short annotations such as “This revealed…”, “I rejected… because…” and “My next test will…”
- Include contrasting references. A historical source and a contemporary practitioner, or a fine artist and a filmmaker, can create more interesting connections.
A Level Art A* advice – AO1 examples
Fine Art: A student exploring “absence” photographs the recently emptied home of a relative, studies how two painters use interior space and muted colour, then makes small painted and collaged responses. The research changes the student’s use of viewpoint and what is deliberately left out.
Photography: A student investigating “between places” repeatedly photographs bus stops at night, compares approaches to cinematic colour and observational street photography, and tests how reflections and obstructions affect the viewer’s sense of distance.
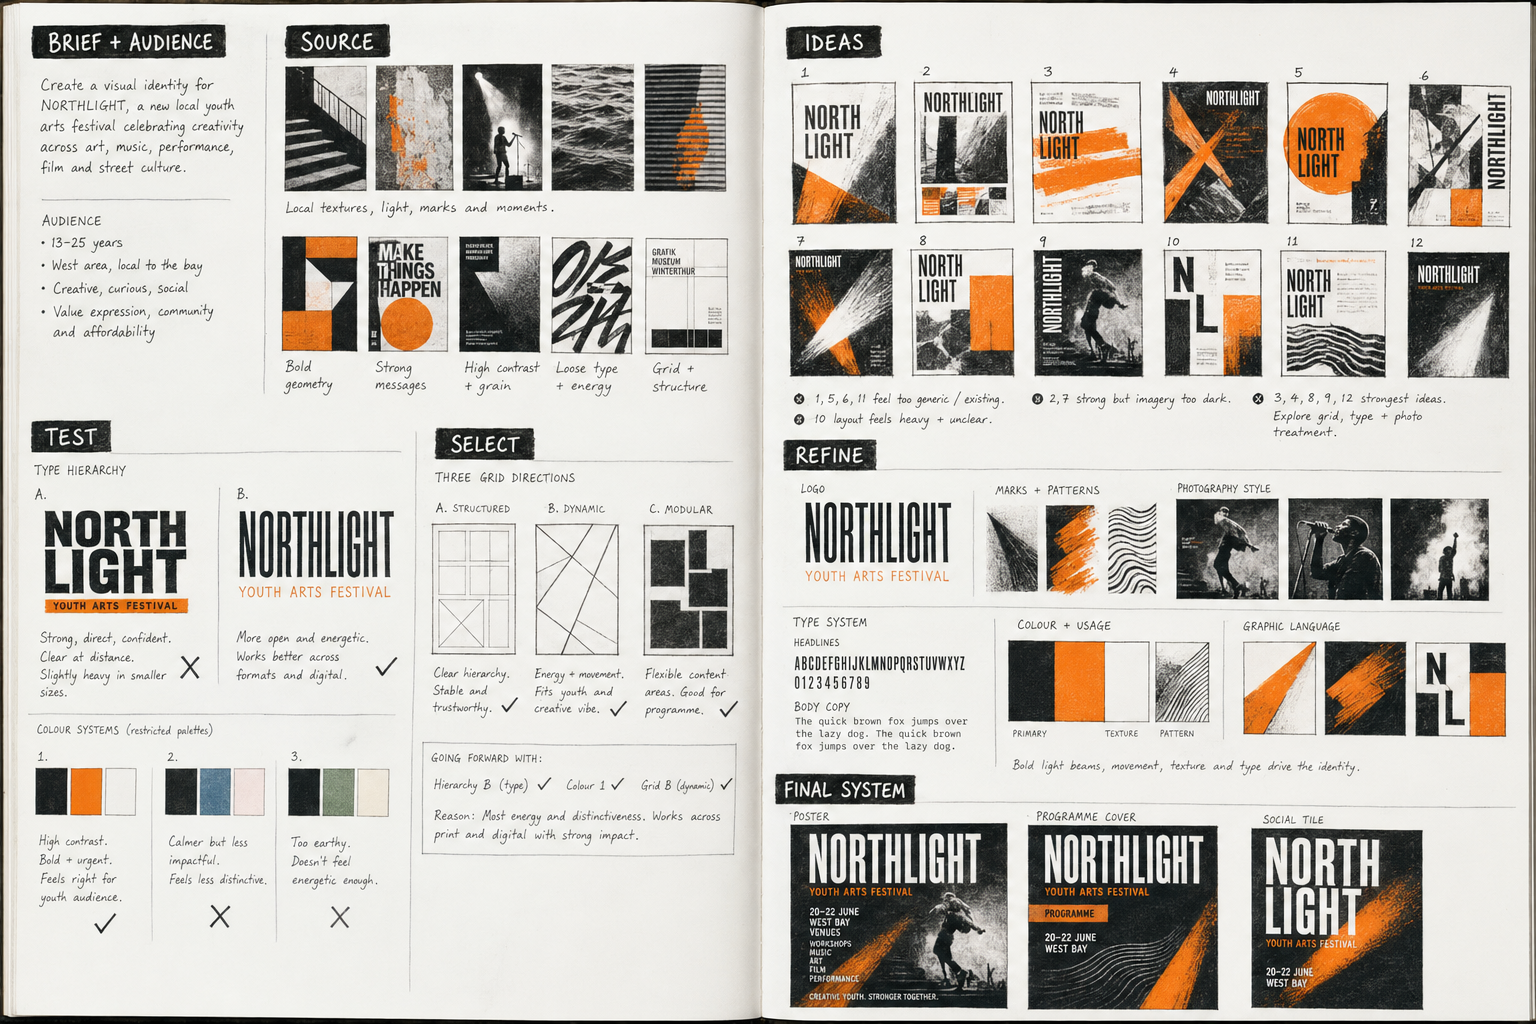
Graphic Communication: A student designing a campaign for a local independent venue studies contrasting cultural identities, analyses grid, type hierarchy and audience, then adapts selected principles using original photographs and self-made lettering.
Common AO1 weakness: several decorative “artist pages” followed by a final idea that would look exactly the same if the research were removed. Research only becomes valuable when it affects decisions.
AO2: Experiment, select and refine with purpose
AO2 rewards exploration, but quantity is not the same as quality. A page of unrelated techniques may demonstrate activity without showing development. Stronger evidence compares possibilities, identifies what succeeds, combines useful discoveries and refines the most promising direction.
How to get an A* in A Level Art – How to strengthen AO2
- Set a clear purpose for each test: composition, scale, focus, surface, pacing, colour, sequence, typography, lighting or meaning.
- Change one important variable at a time so that you can compare results fairly.
- Include unsuccessful outcomes when they teach you something, but explain the lesson and act on it.
- Move beyond technique samples. Apply successful processes to imagery and ideas that belong to your project.
- Refine in stages: rough possibility, selected direction, improved version, near-final trial and resolved decision.
- Choose media because they communicate your intention, not simply because you enjoy using them.
A Level Art A* advice – AO2 examples
Fine Art: Instead of producing one large painting immediately, the student compares transparent and opaque layers, cropped and expanded compositions, warm and restricted palettes, and smooth and distressed grounds. A final small study combines the most effective choices before work begins at full scale.
Photography: The student reshoots the same location using different weather, focal lengths, shutter speeds and degrees of obstruction. Contact sheets are edited with reasons, and only the processing approaches that strengthen the intended atmosphere are developed further.
Graphic Communication: The student develops one visual identity through thumbnail layouts, type pairings, colour tests, image treatments and mock-ups. Feedback from the intended audience leads to changes in hierarchy and legibility rather than a complete unexplained redesign.
Common AO2 weakness: presenting five filters, materials or fonts and describing them as “experiments” without comparing their effect or using the findings to improve anything.
AO3: Record selectively and reflect critically
Recording is broader than observational drawing. Depending on the title and project, it may include photographs, films, contact sheets, diagrams, written observations, interviews, collected data, sound, layouts, storyboards, colour notes, location studies and reflective annotation. The key word is relevant: recording should serve your intentions and help the project move forward.
How to get an A* in A Level Art – How to strengthen AO3
- Generate substantial first-hand source material rather than relying mainly on online images.
- Record the same subject in different ways: wide view, close detail, alternative angle, changing light, movement, sound, texture or sequence.
- Edit contact sheets and collections. Mark selections and explain why certain images are more useful.
- Annotate decisions, not just actions. “I used acrylic paint” is description; “the opaque layer removed the sense of fragility, so I will retain areas of visible ground” is reflection.
- Record ideas as they occur. Small diagrams, thumbnails and written questions can reveal genuine thought more effectively than polished pages made afterwards.
- Return to your intention regularly and ask whether the work still communicates it.
A Level Art A* advice – AO3 examples
Fine Art: A student records a weathered industrial site through panoramic photographs, texture rubbings, measured line drawings, colour notes and close-up studies. The records are then cropped and reorganised to generate compositions rather than displayed as isolated observational exercises.
Photography: A student makes repeated shoots at the same location, keeps complete contact sheets, identifies technical and conceptual problems, and plans targeted reshoots. Exposure data is recorded only where it helps explain a visual decision.
Graphic Communication: A student records the visual character of a local market through original photographs, observed lettering, colour samples, customer comments and quick maps. This first-hand material becomes the basis of a distinctive visual identity.
Common AO3 weakness: beautiful sketchbook pages containing little first-hand information, minimal evaluation and no evidence that reflection changed the next stage.
AO4: Realise a personal and meaningful response
AO4 is not simply “the final piece”. It concerns how successfully you bring your intentions, visual language, research, recording and material decisions together. A final response may be one outcome or a related series, but it should feel like the convincing conclusion of your enquiry rather than a new idea introduced at the last minute.
How to get an A* in A Level Art – How to strengthen AO4
- Write a precise intention before making the outcome. Identify the idea, audience or experience you want to communicate.
- Make a near-final study or prototype that tests scale, composition, colour, materials and presentation together.
- Choose a format appropriate to the idea. A series, book, installation, projection, campaign or sequence may communicate more effectively than one framed image.
- Plan presentation as part of the work: spacing, order, mounting, screen, paper stock, lighting, scale and viewing distance can affect meaning.
- Protect enough time for finishing, but avoid polishing the life out of exploratory work.
- Photograph or document temporary, large-scale, site-specific and time-based work clearly.
A Level Art A* advice – AO4 examples
Fine Art: An investigation into memory concludes with a related group of paintings on translucent surfaces. Earlier photographs determine the imagery, material tests determine the layering, and the spacing allows shadows to become part of the work.
Photography: A project about a changing neighbourhood becomes an edited sequence rather than a collection of separate “best shots”. Image order, scale, pauses and repeated motifs create a deliberate visual rhythm.
Graphic Communication: A campaign is resolved across a poster, publication cover and social format. The applications are coherent but adapted to their different sizes and viewing conditions rather than being identical copies.
Common AO4 weakness: an ambitious outcome with no rehearsal, weak links to the investigation or insufficient time for completion and presentation.
How to get an A* in A Level Art – Choose a project with room to grow
There is no guaranteed “A* theme”. Familiar topics such as identity, landscape or natural forms can lead to outstanding work when approached personally and critically. An unusual title will not rescue a shallow investigation. The best project is one that gives you access to first-hand material, supports repeated investigation, allows meaningful connections and can be completed with the time, facilities and skills available to you.
A promising project usually offers:
- a genuine connection to you, your surroundings, an audience or an issue you care about;
- easy access to subjects, people, places or objects that you can record yourself;
- more than one possible interpretation or visual direction;
- opportunities to explore scale, composition, materials, process, sequence or presentation;
- relevant contextual sources from different periods, cultures or creative disciplines;
- an achievable outcome with scope for ambition.
Three Fine Art project possibilities
1. Traces of use
Investigate worn stairs, repaired clothing, scratched tables, abandoned rooms or objects altered by repeated handling. Record surfaces first-hand, consider what the marks reveal about people and time, and explore painting, print, casting, frottage, collage or installation. The project can move from direct observation towards memory, labour, absence or preservation.
Artists to investigate: explore how Doris Salcedo gives altered domestic materials emotional and political weight, and how Rachel Whiteread records absent spaces by casting objects and architecture.

2. Boundaries and thresholds
Explore windows, doorways, fences, shorelines or the division between public and private space. Use framing, layering, transparency and interrupted views. A personal dimension might involve belonging, migration, safety, exclusion or the difference between what is shown and what is concealed.
Artists to investigate: examine Mona Hatoum for her unsettling transformations of familiar spaces and objects, and revisit Rachel Whiteread’s architectural works to consider presence, enclosure and absence.
3. A personal archive
Begin with family photographs, inherited objects, handwritten notes, maps or recorded stories—with permission where necessary. Investigate how fragments can be enlarged, erased, layered or reconstructed. Avoid simply illustrating family history; develop a visual enquiry into reliability, loss, identity or changing memory.
Artists to investigate: consider Christian Boltanski’s use of photographs, objects and archive-like installations, alongside Louise Bourgeois, whose work transforms personal memory into symbolic forms and spaces.
Three Photography project possibilities
1. One place, many times
Return to one accessible location in different weather, seasons, light and levels of activity. Explore whether repetition reveals social change, routine, neglect or atmosphere. Combine fixed viewpoints with details, portraits, long exposures, reflections or sound. Repeated access makes genuine reshooting and refinement possible.
Photographer to investigate: study Jem Southam’s landscape series to see how returning to a place over months or years can reveal gradual natural and human change.

2. Identity without a conventional portrait
Represent a person through possessions, gesture, clothing, rooms, routines, shadows or deliberately obscured views. Consider consent and avoid reducing the subject to a stereotype. A sequence might move between evidence and ambiguity, allowing the viewer to construct an identity gradually.
Artists to investigate: look at Gillian Wearing for the relationship between public identity and private experience, and Sophie Calle for projects that combine photographs, text, observation and personal narrative.
3. Constructed truth
Create staged scenes that appear believable but contain deliberate contradictions. Experiment with scale, projection, mirrors, handmade sets, colour and digital compositing. The strongest version will have a clear purpose—perhaps questioning memory, advertising, online identity or the reliability of photographic evidence.
Photographers to investigate: compare Jeff Wall’s carefully constructed photographic scenes with the cinematic lighting and production design in Gregory Crewdson’s work.
Three Graphic Communication project possibilities
1. A local cultural identity
Develop an identity for a real or proposed local festival, gallery, music event, market or youth organisation. Research the place and intended audience, generate original imagery and test the identity across posters, tickets, programmes, wayfinding and social formats. A clear brief gives experimentation a purpose.
Designers to investigate: explore the identity systems and environmental graphics of Paula Scher, then compare them with the flexible visual and motion identities in Studio Dumbar’s work.
2. Editorial storytelling
Create a short publication about an issue you can investigate first-hand: disappearing local shops, access to green space, public transport, youth culture or overlooked community stories. Combine your own photography, illustration, information and interviews. Develop grids, typographic hierarchy, image pacing and physical or digital reading experience.
Designers to investigate: study Matt Willey’s editorial and publication design for structured pacing and typographic systems, and contrast it with the expressive, rule-challenging layouts in David Carson’s work.
3. Communicating difficult information
Turn a complex subject into an accessible visual system. This might involve public-health information, environmental data, museum interpretation or a guide for young people. Investigate ethical communication, clarity, audience, hierarchy and tone. Test the work with users and refine it in response to what they understand—not simply what they say they like.
Designers to investigate: compare Giorgia Lupi’s human-centred approach to information with Stefanie Posavec’s accessible, hand-crafted and experimental data visualisation.
Preparing for the final controlled test
The externally set assignment tests whether you can apply what you have learned independently. Your preparatory work and supervised outcome should form one connected response. Exact timings and regulations vary, so always follow the current paper, your examination board’s specification and your school or college instructions.
1. Choose the starting point strategically
Do not automatically choose the first title that sounds interesting. Test two or three possibilities quickly. For each one, list possible first-hand sources, contextual connections, processes, personal meanings and outcomes. Select the starting point that offers the strongest combination of personal engagement and practical access.
2. Establish an intention—but allow it to change
Write a short initial statement explaining what you want to investigate and why. Treat it as a working hypothesis, not a contract. As you record, research and experiment, refine the intention so it becomes more precise and genuinely informed by discovery.
3. Build first-hand material early
Arrange shoots, visits, interviews, drawings or collections as soon as possible. Do not wait until the final week to discover that a location is inaccessible, a model is unavailable or the light is wrong. Produce more source material than you expect to use, then edit it thoughtfully.
4. Make the four AOs visible throughout
Keep a simple evidence check. Have sources changed your ideas? Have tests been compared and refined? Is there purposeful first-hand recording and critical reflection? Does the proposed outcome bring these discoveries together? Do not leave an entire objective until the end.
5. Rehearse the final process
Make a smaller study, prototype, edit, maquette or mock-up using the same essential process planned for the supervised sessions. Time important stages. Identify drying, printing, exporting, construction or mounting problems. A rehearsal should inform the final response without becoming an identical finished copy.
6. Prepare a realistic session plan
Divide the supervised time into stages and include checkpoints. Build in contingency time rather than planning every minute. Decide what must be completed first, what can happen while work dries or exports, and which optional element can be removed if progress is slower than expected.
Example: A Photography student might reserve early time for final shooting, then protect separate periods for selection, precise editing, test printing and sequencing. A Fine Art student may need staged drying time. A Graphic Communication student should allow time for proofing at actual size, correcting errors and exporting or printing final applications.
7. Prepare materials and backups
- Check quantities, sizes, colours, paper, surfaces, fixings and specialist equipment.
- Organise digital files clearly and confirm that linked images, fonts and software work on the examination computer.
- Prepare permitted offline copies and printed references in accordance with your centre’s rules.
- Bring a simple alternative material or process in case equipment fails.
- Confirm printing, mounting, drying and storage arrangements with your teacher before the supervised period begins.
8. Know when preparation must stop
Once supervised work begins, preparatory material is normally frozen: you may refer to it, but you must not continue altering it. Make sure all essential plans, source records, tests, colour decisions, measurements and references are complete beforehand. Follow your examination board and centre instructions exactly.
A final A* readiness checklist
- My enquiry is personal, focused and capable of sustained development.
- My contextual research analyses creative decisions and visibly informs my own work.
- I use mainly relevant first-hand source material and acknowledge material that is not mine.
- My experiments test clear questions rather than simply displaying techniques.
- I compare results, reject weaker options and refine the strongest ideas.
- My annotation evaluates effects and identifies specific next steps.
- The journey from starting point to intended outcome is visible and convincing.
- My final response is ambitious, achievable and supported by a practical rehearsal.
- Presentation choices reinforce meaning and do not merely decorate the work.
- I have checked the current specification and followed my teacher’s examination instructions.
Progress, not perfection
A* work does not have to be flawless. It should show a highly developed ability to investigate, question, select, refine, reflect and realise ideas. Productive risks, changes of direction and unsuccessful experiments can strengthen a portfolio when you understand them and use them intelligently. Concentrate on making the next decision purposeful, then repeat that habit throughout the project.
Would an independent portfolio review help?
If you are unsure which Assessment Objective is limiting your progress, an independent review can identify strengths, gaps and practical priorities. You can choose one AO or any combination of AO1–AO4, depending on where you feel support is most useful.
Important: This page offers general educational guidance and does not guarantee a particular grade. Assessment arrangements can change. Always use the current specification, assessment materials and instructions supplied by your own examination board, school or college. The four A Level Art and Design Assessment Objectives are set nationally; you can also consult the official AQA scheme of assessment as one current example.