
BTEC Component 2 Brief Examples
See how a student can move from a creative brief to a purposeful final response. This annotated example follows one fictional project through interpreting the brief, research, initial ideas, practical experiments, development, presentation and review.
Important: this is an original teaching example, not official Pearson learner work and not a live assessment brief. Do not copy it. Your response must follow the brief and instructions issued by your school or college.
Component 2 at a glance
- Official title: Responding to a Brief
- Guided learning: 48 hours
- Assessment: external synoptic task, set and marked by Pearson
- Supervised assessment: 20 hours in the Pearson-timetabled period
- Available marks: 60
- Portfolio evidence: development, review and final response for a specified audience
Always use the current task and centre instructions. Assessment arrangements can change, so teachers should check the latest Pearson specification and administrative guidance.
What does Component 2 assess?
AO1: Understand the brief
Identify the audience, purpose, required outcome, opportunities and constraints. Use relevant research to inform what you intend to make.
AO2: Develop and produce
Plan your time, generate alternatives, test suitable materials and processes, review the results and refine a response that fits the brief.
AO3: Present the response
Organise a clear portfolio that shows key stages, explains decisions and presents the final response appropriately.
The thread that joins them
Keep returning to the brief. Strong work makes it easy to see why each research choice, experiment and change helped the final response suit its audience and purpose.
A fictional example brief
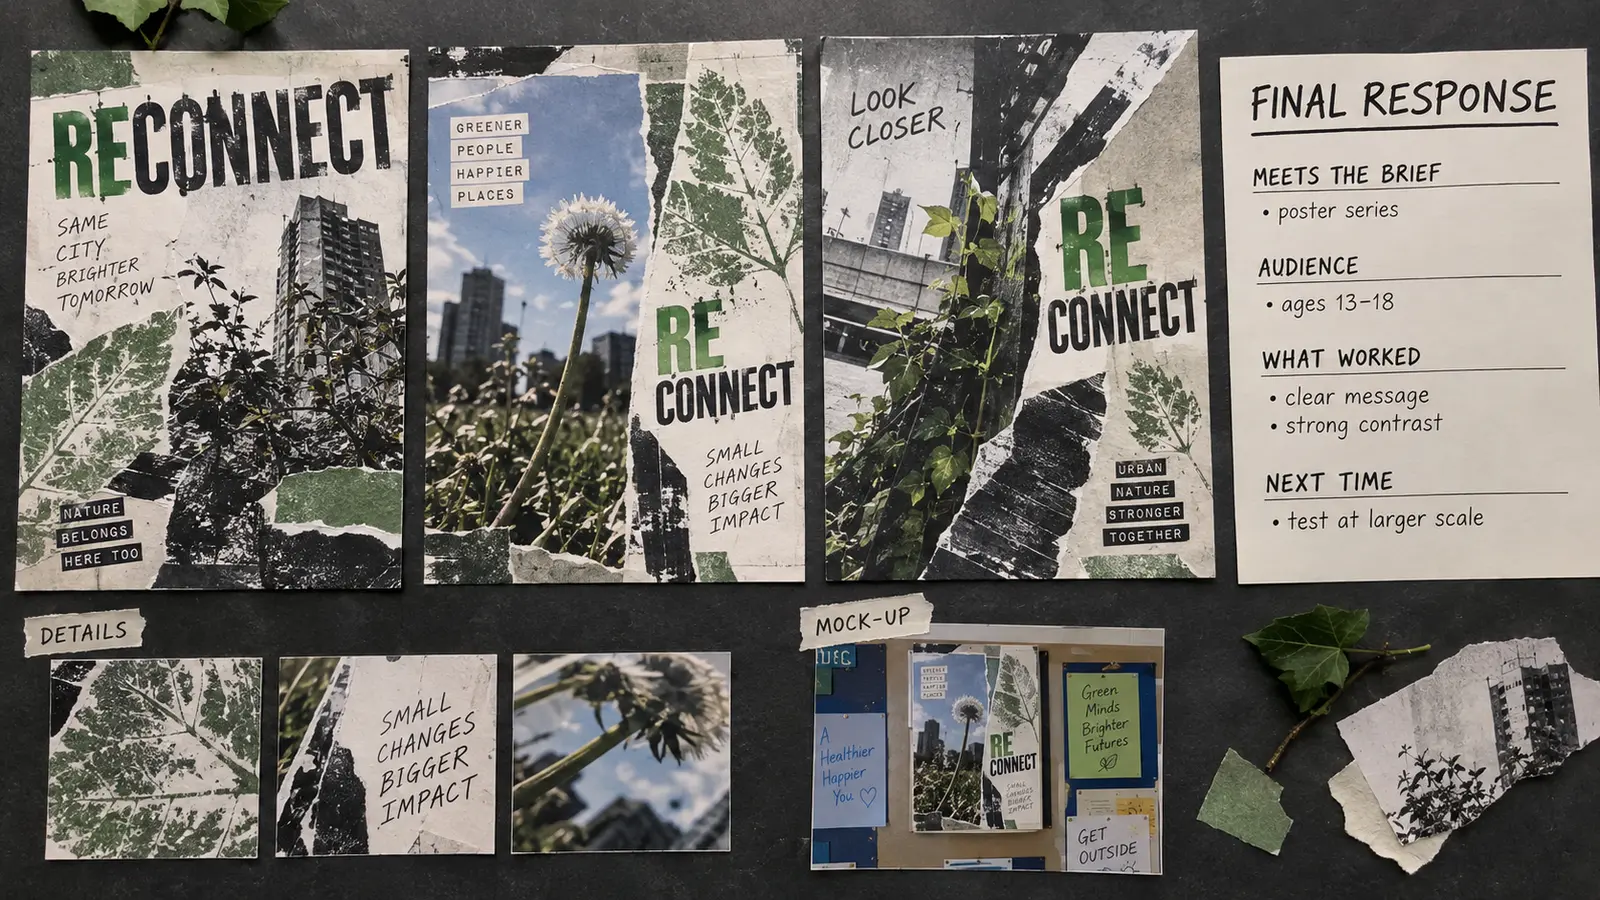
RECONNECT: notice nature in your town
A youth wellbeing group wants a set of visual outcomes that encourages young people to notice and value nature in built-up places.
- Audience: young people aged 13–18
- Purpose: raise awareness and encourage closer observation
- Outcome: a connected series of two or three posters for school and community display
- Requirements: use original visual research; combine image and text; make the message clear from a distance
- Constraints: available time, safe materials, school facilities and a realistic print size
This made-up brief is broad enough to allow different ideas, but specific enough to test whether the response is fit for purpose.
1 Decode the brief before making
Underline the words that control your response. Separate what you must do from what you can choose. Turn the brief into questions: Who will see it? What should they think or do? What must be produced? What limits the project?
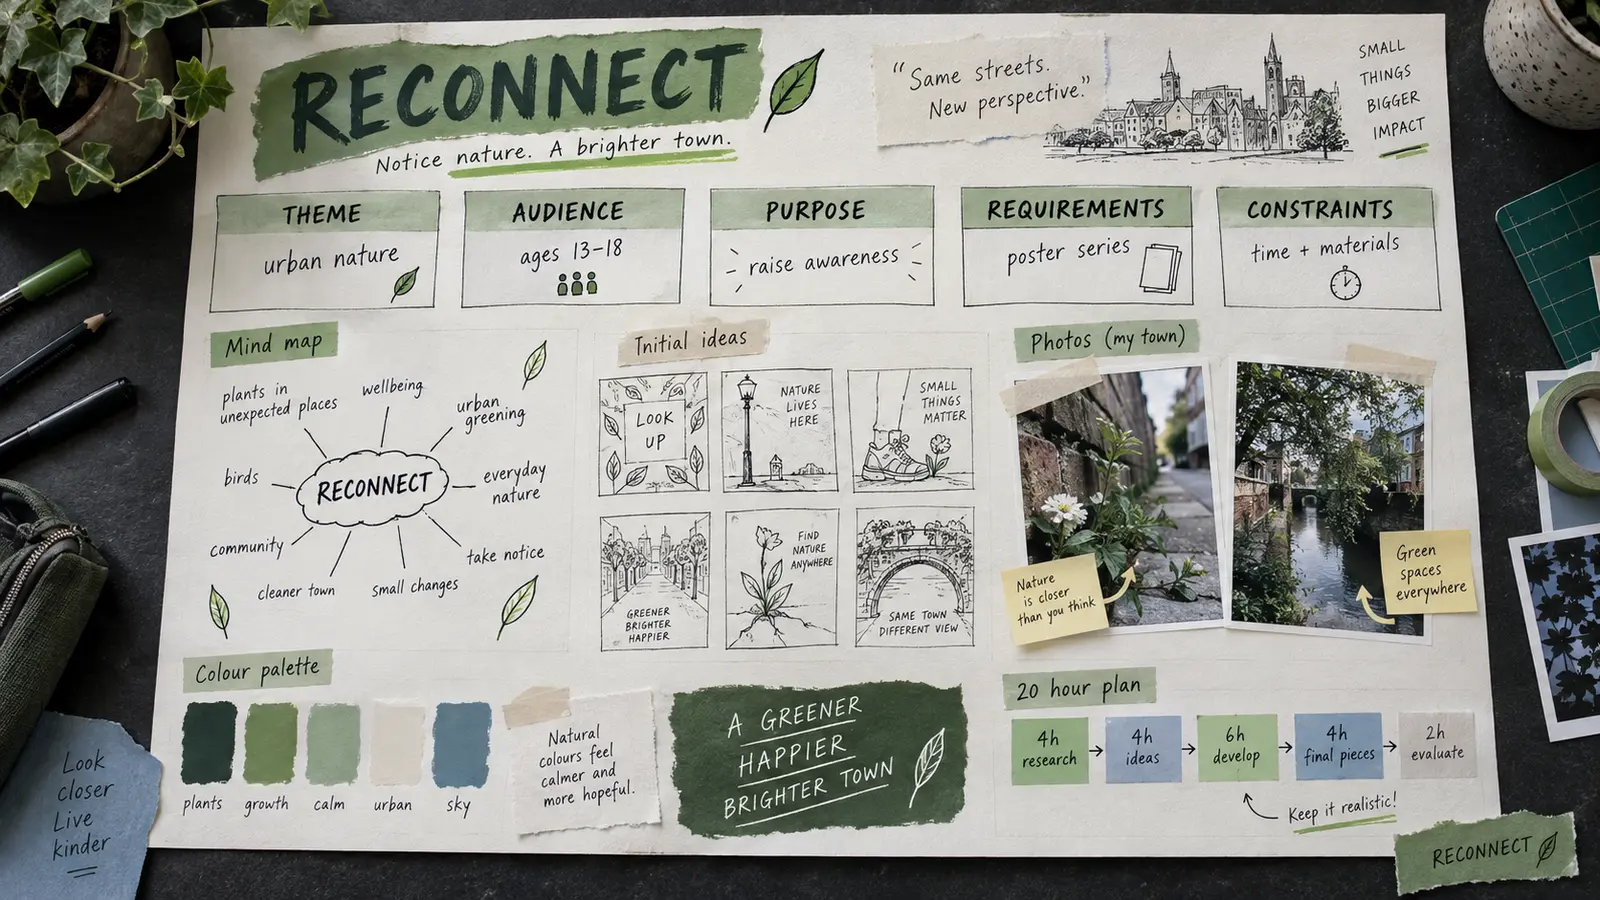
Useful annotation: “The audience is 13–18, so I will use a short message, bold contrast and familiar photographs from the local area.”
2 Research, then generate alternatives
Collect first-hand evidence where possible: photographs, drawings, observations, material samples or interviews. Add selective secondary research to understand relevant creative approaches. Explain what you notice and how it could influence your work.
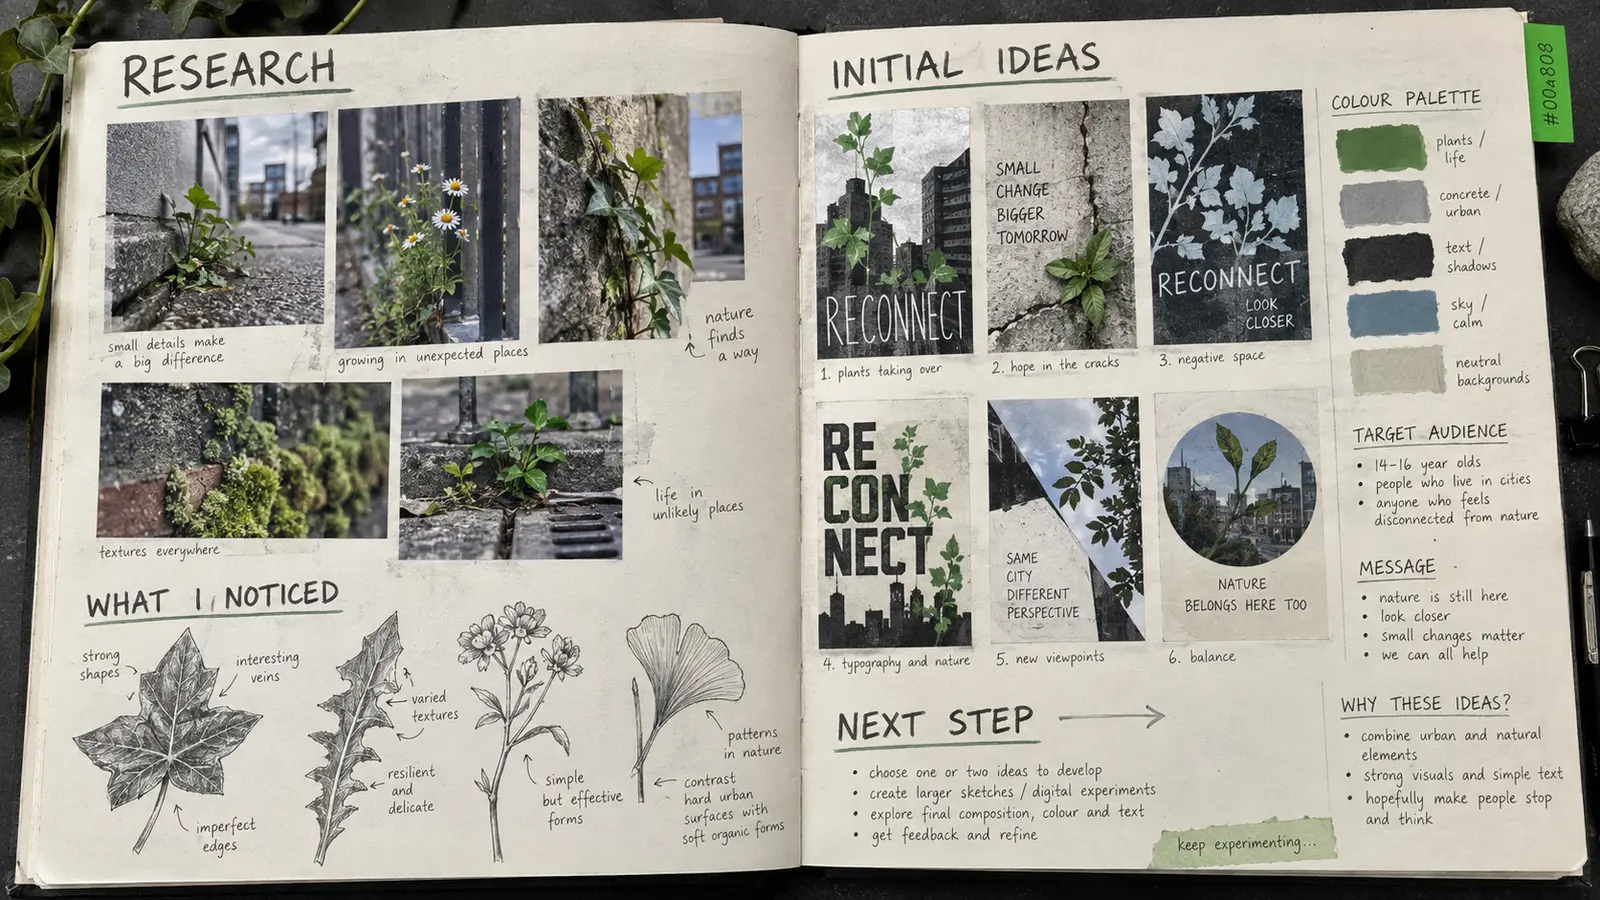
Research should do something
Label the observation, then state the consequence: “The plants break through hard geometric surfaces, so I will test organic shapes against rigid grids.”
Ideas must be genuinely different
Change composition, viewpoint, process, message or format. Six colour versions of the same layout are tests, not six initial ideas.
3 Test, review, refine
Choose experiments because they answer a question raised by the brief. Compare results, record what worked, identify a specific problem and show the next change. Development is visible decision-making—not simply producing more work.
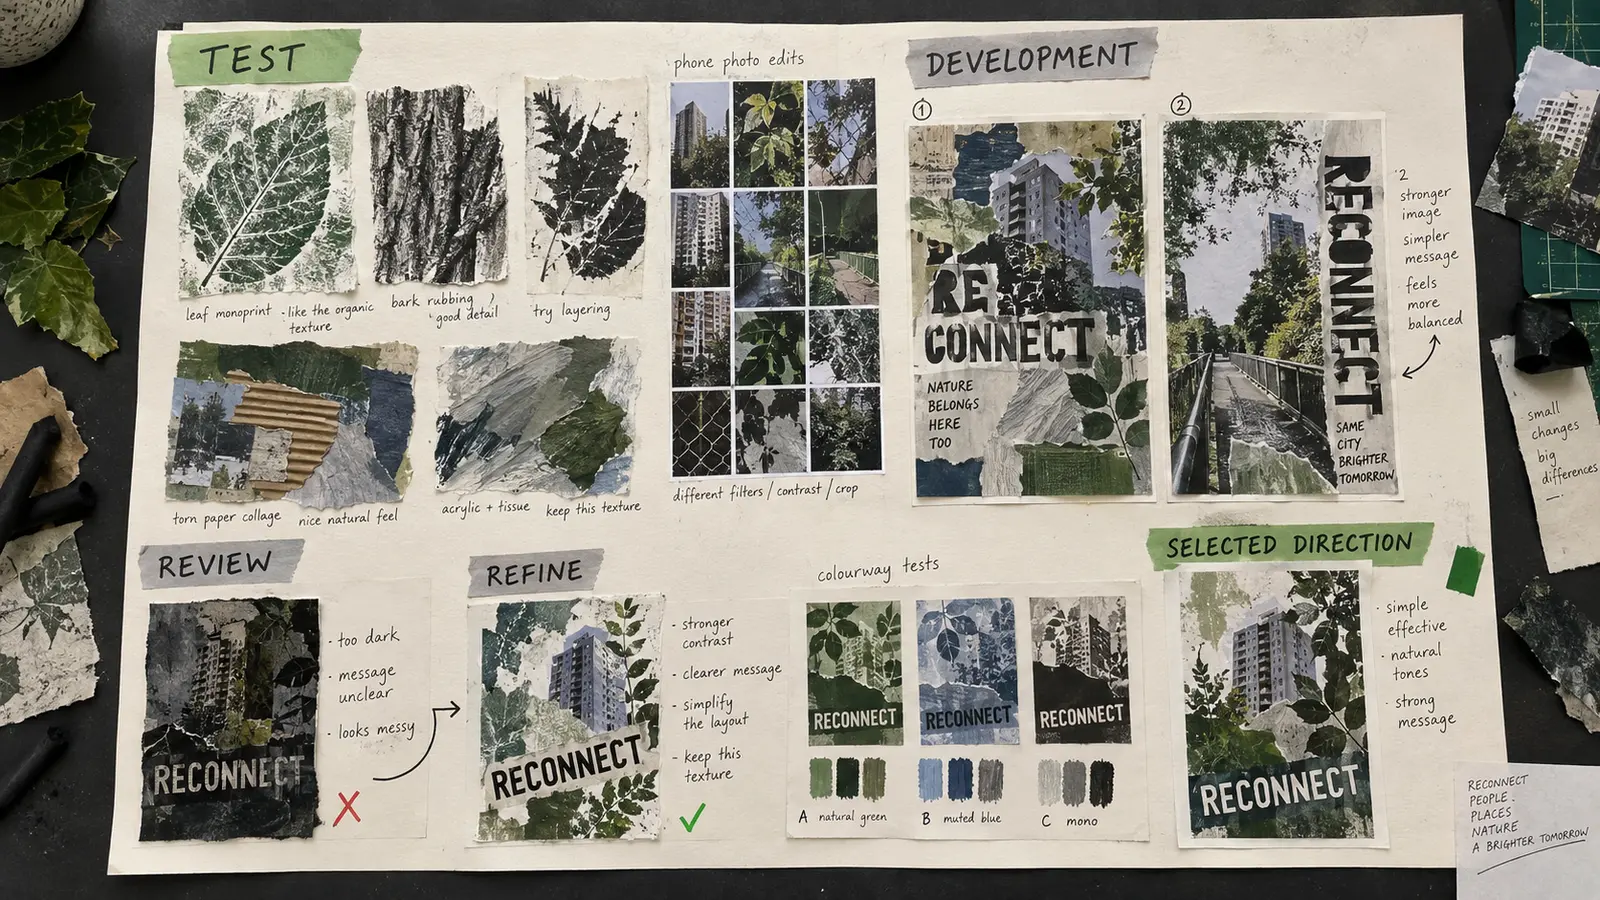
A strong development sentence: “The first layout felt crowded and the message disappeared. I enlarged the photograph, removed two textures and moved the title into the highest-contrast area so it reads quickly.”
4 Present and review the final response
Show the finished outcome clearly, including useful details or alternative views. Then judge it against the actual requirements—not only whether you like it. Refer to audience, purpose, format, technical quality and the decisions that made the outcome more suitable.
Component 2 portfolio checklist
- I identified the audience, purpose, outcome, requirements and constraints.
- My research is relevant and I explained how it informed my intentions.
- I explored several different ideas before selecting a direction.
- My material and process tests answer purposeful questions.
- I showed review, change and refinement rather than hiding weak trials.
- My final response visibly connects to the development work.
- I presented key stages in a clear order with readable images and annotation.
- I reviewed the outcome against the brief and identified a realistic next step.
Common mistakes to avoid
Forgetting the audience
Repeatedly link colour, scale, imagery, language and format to the people named in the brief.
Research without influence
Do not fill pages with facts. Select useful features, analyse them and show how they changed your thinking.
Experiments without review
A test becomes evidence of development when you compare it, identify what it taught you and act on that learning.
A polished outcome with no journey
The portfolio must communicate the development process as well as the final response. Keep photographs of important stages.
Frequently asked questions
Click or tap a green question bar below to reveal the answer. Select it again to close the answer.
Is Component 2 an exam?
It is an externally assessed synoptic task set and marked by Pearson. Work is completed under supervised conditions in the assessment period specified by Pearson, so always follow your centre’s instructions.
How long is the supervised assessment?
The current Pearson specification states a 20-hour supervised assessment period. Your school or college will arrange the sessions within Pearson’s timetabled period and explain the conditions for each stage.
Do I have to use the same art discipline as Component 1?
Your response must suit the issued brief and the resources available at your centre. Skills developed in Component 1 support Component 2, but the appropriate discipline or combination of disciplines depends on the task and your intentions.
Can I change my idea during development?
Yes. A reasoned change can be strong evidence when you show what you learned, why the earlier direction was less suitable and how the new decision answers the brief more effectively.
How much annotation should I write?
Use enough to make your intentions, comparisons, decisions and links to the brief clear. Short, specific annotations beside relevant images are usually more useful than long descriptions of what is already visible.
Are these official Pearson examples?
No. The brief and all visuals on this page are original teaching examples created to explain the process. For official requirements, use the current Pearson specification, sample assessment materials and instructions from your centre.
Qualification facts checked against Pearson’s BTEC Level 1/Level 2 Tech Award in Art and Design Practice specification, Issue 4 (March 2025). Always check the current version before assessment.