

Home > GCSE & A Level Art Help > How to Turn Artist Research into Your Own Art Ideas
Good artist research should change what you make next. If your research page ends with a biography and a copied picture, it may show that you found information—but it does not yet show how the artist has helped you develop your own ideas.
The important move is from “What did this artist do?” to “What can I investigate because of what I have discovered?” This is where AO1 research begins to generate purposeful AO2 experimentation.
The simple formula
Notice something useful → test it with your own subject matter → compare the results → combine and refine the strongest ideas.
How do you develop ideas from artist research?
To develop ideas from artist research, identify one or two specific features of the artist’s work—such as their use of shape, materials, viewpoint, layering, repetition or meaning. Apply those features to your own first-hand source, create several different tests, annotate what changed and use the most successful results to plan your next step. You are borrowing a way of thinking or working, not copying a finished image.
- AO1: understand the artist and identify relevant ideas, methods and contexts.
- AO2: experiment with those discoveries through your own materials, processes and refinements.
- AO3: record your own observations, photographs, drawings, trials and decisions.
- AO4: bring the most successful developments together in a personal and meaningful response.
Although this post concentrates on the connection between AO1 and AO2, strong development often creates useful evidence for all four assessment objectives.
Why copying an artist is not enough
Making a study of an artwork can be valuable. It can help you understand colour mixing, brushwork, construction, composition or another technique. The problem arises when the study becomes the end of the process. A careful copy may demonstrate practical control, but it does not automatically prove that you can develop an independent idea.
| Limited response | Stronger development |
|---|---|
| I copied one of the artist’s pictures. | I tested the artist’s use of cropping on photographs I took myself. |
| I used the same colours as the artist. | I compared three colour palettes to see which best communicated my own idea. |
| I drew the same subject in the artist’s style. | I applied the artist’s mark-making to a subject connected with my project theme. |
| I wrote a biography. | I explained which features are relevant to my work and showed what I did because of them. |
| I made one artist copy and moved on. | I produced several tests, evaluated them and used the results to plan further development. |
Influence should be visible, but your decisions should be visible too.
Step 1: Find the artist’s useful ingredients
Do not try to borrow everything. Look closely and break the artist’s work into ingredients. Select only the features that could move your project forward.
Visual ingredients
- Shape and form
- Line and mark-making
- Colour and tone
- Texture and surface
- Scale and proportion
- Composition and viewpoint
- Pattern, rhythm and repetition
- Positive and negative space
Conceptual ingredients
- Theme or question
- Mood and atmosphere
- Symbolism
- Story or memory
- Identity and culture
- Place and environment
- Audience participation
- Transformation or change
Practical ingredients
- Materials
- Tools and processes
- Layering or construction
- Photography and editing
- Display and installation
- Handmade or digital methods
- Working from observation
- Chance and controlled accident
A useful artist-research page might circle, crop or enlarge details and add brief notes such as: “repeated holes create rhythm”, “strong contrast makes the form feel dramatic” or “transparent layers allow several viewpoints to appear together”. These observations are useful because each one can become an experiment.
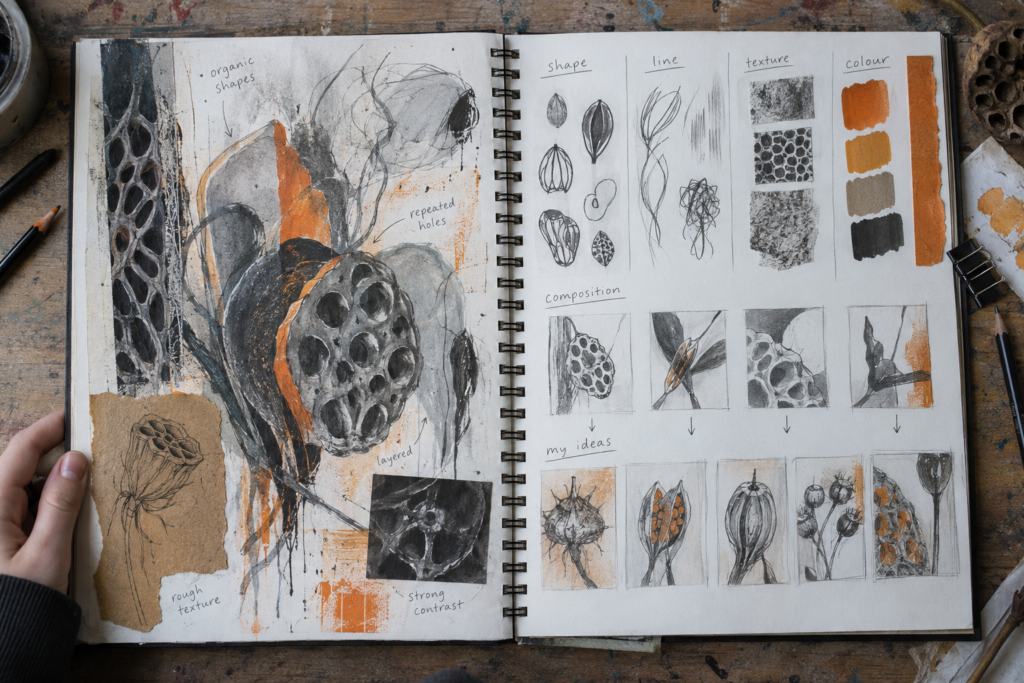
Step 2: Choose a connection to your project
Ask why this artist belongs in your project. “I like their work” is a starting point, not a full explanation. A stronger connection identifies what the artist can help you investigate.
- Subject connection: both you and the artist investigate natural forms, portraits, buildings, objects or a related subject.
- Visual connection: their fragmentation, colour, structure or use of space could help you solve a compositional problem.
- Material connection: their carving, layering, stitching, photography or assemblage suggests a process you could test.
- Conceptual connection: their ideas about memory, identity, environment or transformation deepen your theme.
- Presentation connection: their scale, sequence, installation or display method changes how an audience experiences the work.
Complete this sentence before experimenting:
“This artist is relevant to my project because ________. I will investigate their use of ________ by applying it to my own photographs/drawings/objects of ________.”
Step 3: Bring in your own first-hand source
This is one of the most reliable ways to make the work personal. Instead of applying the artist’s ideas to an image found online, collect material connected with your experience and project:
- your own photographs;
- observational drawings;
- objects, packaging or fabrics you have collected;
- maps, tickets, handwriting or family documents you have permission to use;
- recordings of a place, surface or changing light;
- interviews, memories or short phrases gathered for the project;
- material samples and textures made by you.
First-hand sources do not have to be spectacular. A cracked pavement, an old chair, the view from a bus, a family recipe, shadows in a stairwell or seed pods from a local park can become rich material when observed and transformed carefully.
Step 4: Turn one discovery into several AO2 experiments
One successful-looking piece is not the same as development. Create a family of connected tests. Keep one element consistent and change another so that you can learn from the comparison.
| Variable to change | Experiments you could try | Question to answer |
|---|---|---|
| Scale | Tiny repeated studies; one enlarged detail; life-size version | Does scale make the subject intimate, powerful or unfamiliar? |
| Crop/viewpoint | Close-up, overhead, low viewpoint, off-centre crop, multiple viewpoints | Which composition directs attention most effectively? |
| Material | Pencil, paint, print, collage, fabric, wire, clay, photography or digital media | Which material best communicates the texture or idea? |
| Colour | Observed, limited, complementary, monochrome, symbolic or distorted colour | How does colour alter mood and meaning? |
| Surface | Smooth, torn, folded, scratched, stitched, transparent or layered | What does the surface add that a flat image cannot? |
| Arrangement | Repeat, overlap, isolate, fragment, rotate, mirror or create a sequence | How does the arrangement change rhythm and emphasis? |
| Process | Controlled, accidental, fast, slow, erased, reconstructed or digitally altered | Which process produces results worth developing? |
A useful experiment does not need to be large or perfect. Its purpose is to answer a question. Eight small tests that reveal clear decisions can be more valuable than one polished page with no evidence of alternatives.
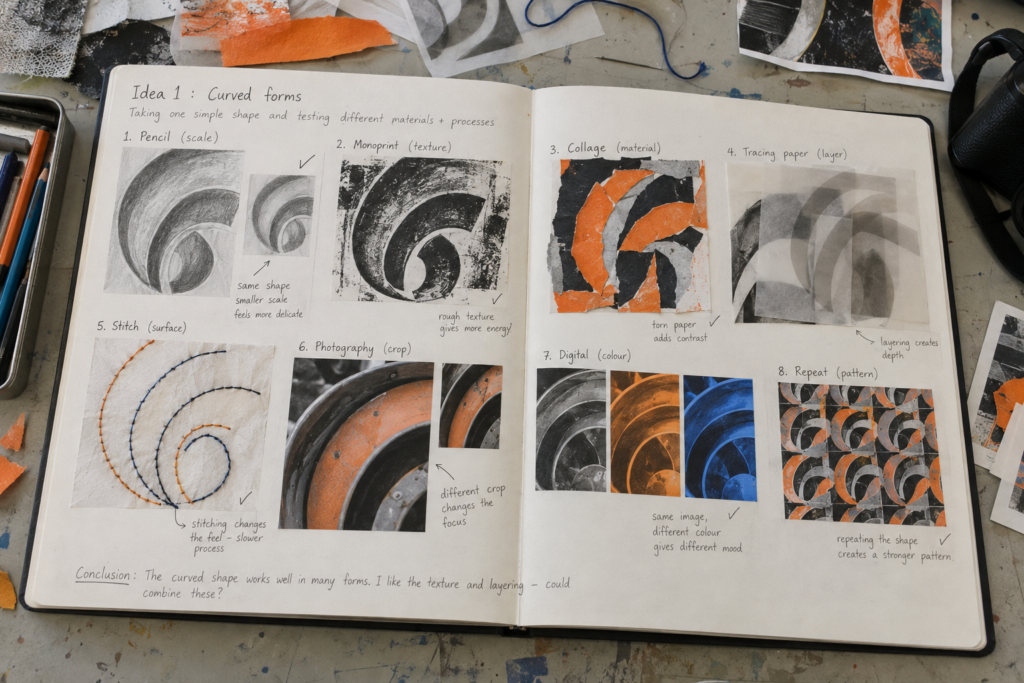
Step 5: Annotate the decisions—not just the materials
“I used pencil and then orange paint” only records what happened. Strong annotation explains purpose, effect, judgement and next action. Keep it concise and place it beside the relevant work.
| Annotation job | Helpful prompt | Example |
|---|---|---|
| Purpose | What were you testing? | I enlarged the seed-pod openings to test whether negative space could become the main focus. |
| Connection | What came from the research? | The repeated pierced forms were prompted by my research, but the subject came from my own photographs. |
| Effect | What changed visually? | The tracing paper softened the contrast and made the overlapping shapes appear deeper. |
| Judgement | What worked—or did not? | The stitched version created a stronger surface, but the regular spacing felt too controlled. |
| Next step | What will you do because of this? | I will combine the uneven monoprint texture with the layered composition and test it at a larger scale. |
For more help with purposeful annotation, use the GCSE Art annotation guide. The same principle applies at A Level, but explanations should usually show greater independence, depth and critical understanding.
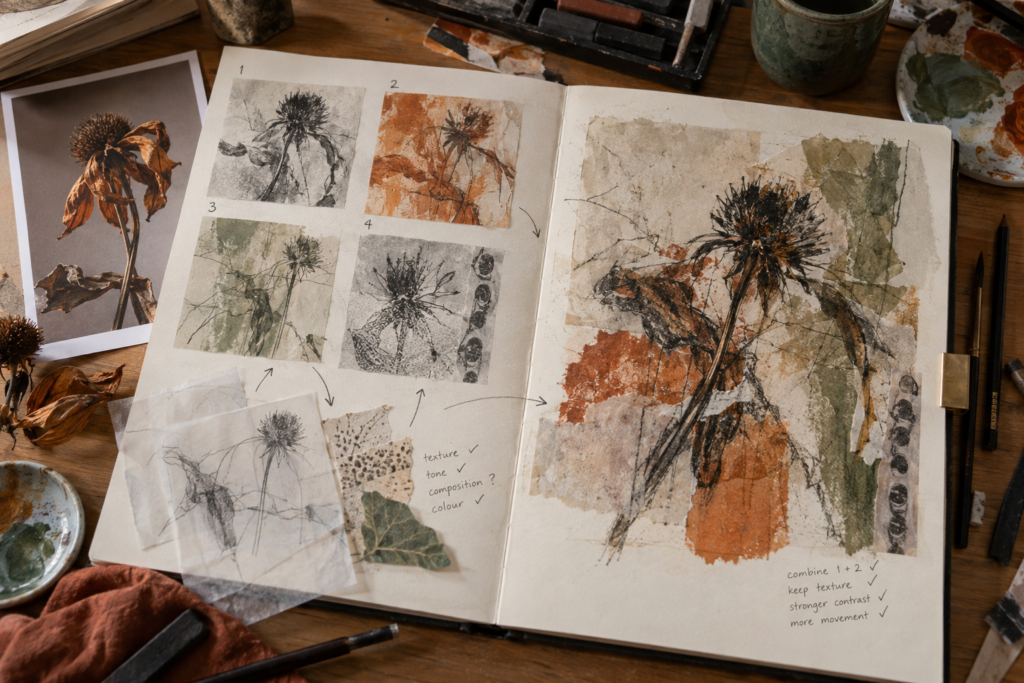
Step 6: Select, combine and refine
Development does not mean keeping every experiment. It means using evidence to choose a direction. Lay your tests side by side and identify:
- the composition with the clearest focus;
- the material that best suits your meaning;
- the most interesting accident or unexpected result;
- the feature that still needs more control;
- two successful qualities that could be combined;
- what should be removed because it distracts from the idea.
Your next piece might combine the crop from experiment two, the surface from experiment four and the restricted colour from experiment six. This is more convincing than simply choosing the neatest test. You are building a response from decisions supported by what you have learned.
Four artists—and the kinds of questions they could generate
The examples below are not recipes for copying an artist. They show how research can lead to a question, your own source material and a series of experiments. Always study individual artworks carefully and explain the connection in your own words.
Barbara Hepworth: form, material and negative space
Research the relationship between solid form, openings, internal space, material and the surrounding landscape in Barbara Hepworth’s work at Tate. You might photograph shells, stones, seed pods or architectural openings, simplify them into solid and void shapes, then test card, clay, soap, wire or layered paper. Your purpose is not to reproduce a Hepworth sculpture; it is to investigate how negative space can become active in your own response.
Andy Goldsworthy: material, place and change
Tate’s introduction to Andy Goldsworthy shows how natural materials and place can shape the work. A student could collect fallen leaves, twigs, stones or shadows from a local place, arrange them through repetition or gradual change, photograph the stages and record what weather or time does to the result. The personal element comes from your location, selection, arrangement and documentation.
Cornelia Parker: transformation and everyday objects
Cornelia Parker’s practice can prompt questions about what happens when familiar objects are altered, separated, suspended or placed in a new context. Explore the Cornelia Parker artist page at Tate, then consider a safe, discarded object connected with your theme. Photograph it from several viewpoints, trace its silhouette, enlarge a fragment, rearrange repeated parts or translate damage and repair through collage. Ask permission and follow workshop safety rules before cutting, crushing or dismantling anything.
Yinka Shonibare: pattern, identity and hidden histories
Yinka Shonibare’s work at Tate can lead to research about pattern, cultural identity, clothing, power and historical narratives. Instead of copying a fabric pattern, create patterns from photographs, symbols, handwriting or objects connected with your own family, community or place. Test how scale, repetition and placement change their meaning. Context matters: avoid treating culturally specific materials as decoration without understanding them.
A complete worked example: natural forms
Imagine that your project theme is Structures in Nature and you have researched sculptural forms with openings and internal spaces.
- AO1 discovery: You notice that the relationship between mass and empty space is more important to your project than the exact appearance of any one sculpture.
- Personal source: You photograph dried seed pods and make observational drawings of their openings, broken edges and shadows.
- Initial translation: You isolate five shapes from the photographs and simplify them through line drawings and black-paper silhouettes.
- AO2 tests: You enlarge one opening, repeat another, overlap tracing-paper shapes, print rough textures and build a small pierced card form.
- Evaluation: You decide the overlapping transparent layers communicate fragility, while the pierced form creates the strongest shadows.
- Combination: You photograph the model’s shadows, layer them with your seed-pod drawings and test a restricted graphite-and-orange palette.
- Refinement: You reduce unnecessary details, vary the scale of the openings and create a larger mixed-media response.
The artist connection remains clear, but the imagery, photographs, experiments, selection and outcome belong to the student. That is development.
What should the sketchbook pages look like?
There is no compulsory decorative style. Aim for a readable sequence rather than filling every gap. A convincing run of pages could include:
- a focused artist-research page with selected images and your own analysis;
- enlarged or redrawn details showing the exact features you noticed;
- your first-hand photographs, drawings or collected sources;
- small thumbnails exploring alternative compositions;
- material and process tests, including unsuccessful versions;
- brief annotations beside the relevant experiment;
- a comparison or selection page explaining what will be combined;
- a larger refined study that clearly grows from the earlier evidence.
Arrows, tracing-paper overlays, fold-outs, contact sheets and material samples can help show connections when they serve the development. They should not be added simply to make a page look “arty”. The sequence of thinking is more important than surface decoration.
Common problems—and how to correct them
| Problem | Why it limits development | Immediate correction |
|---|---|---|
| Too much biography | It describes the artist but does not show relevance. | Replace general facts with close visual analysis and a practical next step. |
| One large copy | It gives little evidence of choice or transformation. | Extract three features and apply each to your own source. |
| Random experiments | The pages look busy but do not answer a question. | State what remains constant and what variable each test changes. |
| No first-hand source | The result may remain too close to online imagery. | Take your own photographs or make direct observations before developing further. |
| Only successful work shown | The examiner cannot see how decisions were made. | Include selected unsuccessful tests and explain what they taught you. |
| Vague annotation | “I like this” gives no reason or direction. | Name the visual effect, judge it against your intention and state the next action. |
| Too many artists | The project jumps repeatedly instead of developing depth. | Choose fewer, more relevant artists and return to their ideas at different stages. |
| Artist influence disappears | The research becomes disconnected from later work. | Refer back explicitly when selecting, combining and refining experiments. |
Useful sentence starters
- The most relevant feature of this artist’s work is ________ because ________.
- Rather than copying the whole artwork, I isolated ________.
- I applied this idea to my own photograph/drawing of ________.
- I kept ________ the same but changed ________ to compare the effect.
- This experiment communicates ________ more successfully because ________.
- The result was less successful when ________, which showed me that ________.
- I will combine the ________ from test two with the ________ from test five.
- My work has moved away from the artist by ________.
- This development is personal to me because ________.
A quick AO1-to-AO2 checklist
- Have I explained why the artist is relevant to my project?
- Have I identified specific visual, conceptual or practical features?
- Have I used my own first-hand source material?
- Have I changed or transformed the artist’s idea rather than copied the result?
- Have I produced several connected experiments?
- Does each experiment have a purpose or question?
- Have I compared the results and made a judgement?
- Have I stated what I will do next?
- Can the viewer see how the research influenced later pages?
- Does the work become increasingly personal and independent?
Frequently asked questions
How many artist copies should I make?
There is no universal number. One focused study can be enough if it teaches you something useful and leads to your own experiments. Several disconnected copies are usually less valuable than one carefully analysed study followed by clear development.
Can I combine the influence of two artists?
Yes. You might combine one artist’s approach to composition with another artist’s materials or ideas. Explain why the combination suits your intention, test it rather than assuming it will work, and make sure the result also includes your own source material and decisions.
Does every experiment need to be successful?
No. An unsuccessful experiment can provide strong evidence when you identify why it failed and use that information to improve the next test. Do not fill the portfolio with repeated weak work, but retain selected examples that make the development understandable.
How do I avoid copying an artist’s style?
Work from your own subject matter, isolate only selected features, test alternatives and combine influences with personal observations. Concentrate on the artist’s questions, processes or decisions rather than trying to reproduce the recognisable appearance of a finished work.
Can artist research come later in a project?
Yes. Research can help at any point: to open a starting idea, solve a technical problem, deepen meaning, reconsider composition or plan presentation. Returning to an artist later can show sustained development more clearly than completing one research page and never referring to it again.
Should I use the same process as the artist?
You may test a related process when it is safe, practical and relevant, but exact replication is not always necessary. You can translate a sculptural idea into photography, a painted texture into print, or a physical layering process into digital editing. Translation can create more independent results.
How is this different at A Level?
The same AO1-to-AO2 connection applies, but A Level work should usually show greater depth, independence, critical understanding and sustained refinement. Students should justify the relevance of sources, investigate context thoughtfully and develop a coherent personal direction rather than following a set classroom recipe.
Research becomes valuable when it changes the work
The aim is not to hide your influences. Artists and designers learn by looking closely at other work. The aim is to respond actively: notice, question, test, adapt, reject, combine and refine. When an examiner follows your pages, they should be able to see both the research connection and the growth of your independence.
Start small. Choose one useful feature from your research, apply it to one first-hand source and create three genuinely different tests. Evaluate them honestly. That single sequence can turn a static research page into the beginning of a strong personal project.
Would an independent portfolio review help?
If you are unsure whether your research is producing enough development—or whether the connection between AO1 and AO2 is clear—Portfolio to A Star can provide practical, personalised guidance based on the evidence visible in your work.
You can also explore the free GCSE and A Level Art resources, the GCSE Art Help hub or the A Level Art Help hub.
Artist links and further research
Use museum and artist sources for research, but write analysis in your own words. Credit every artwork image according to your school or college guidance. The original exemplar images supplied with this post do not reproduce the work of any named artist.
No responses yet