

Natural forms can give you far more than a collection of attractive objects to draw. A curled leaf, broken shell, seed head, bone, feather, crystal, fungus or water pattern can lead to investigations of structure, growth, repetition, fragility, change, protection, movement and time. The strongest projects begin by looking closely, asking questions and allowing one discovery to lead naturally to the next.
This guide is written for both GCSE and A Level Art & Design students. It offers artists, photographers and designers to investigate; practical ways to gather first-hand sources; starting exercises for Fine Art, Photography and Graphic Communication; and a clear route from an initial natural form to a personal, resolved response.
The Most Important Principle
Do not begin by asking, “What final piece shall I make?” Begin by asking, “What is interesting about this form, and how could I investigate it?”
A successful natural forms art project is not a straight journey from a photograph of a flower to a large painting of the same flower. It is a process of noticing, recording, selecting, testing, comparing and refining. Your final response should grow from that process rather than being decided before the investigation begins.
What Are Natural Forms?
Natural forms are shapes, structures, surfaces and patterns found in the living world and in naturally occurring materials. Some are immediately recognisable; others become almost abstract when they are enlarged, cropped, lit from an unusual direction or viewed through a camera or microscope.
- Plant forms: leaves, veins, roots, bark, thorns, seed pods, flowers, fruit, grasses and fungi
- Animal forms: shells, feathers, bones, horns, insect wings, nests and naturally shed materials
- Geological forms: rocks, crystals, fossils, erosion, strata, cracked earth and mineral surfaces
- Water and weather: ripples, droplets, frost, ice, clouds, foam, shadows and reflections
- Microscopic structures: cells, pollen, radiolaria, diatoms and crystalline growth
- Natural processes: growth, decay, branching, repetition, symmetry, camouflage, movement and transformation
Remember that your subject does not have to remain recognisable. A leaf can become a network of lines, a shell can become a spiral system, and a seed pod can become an investigation of repetition, enclosure or rhythm.
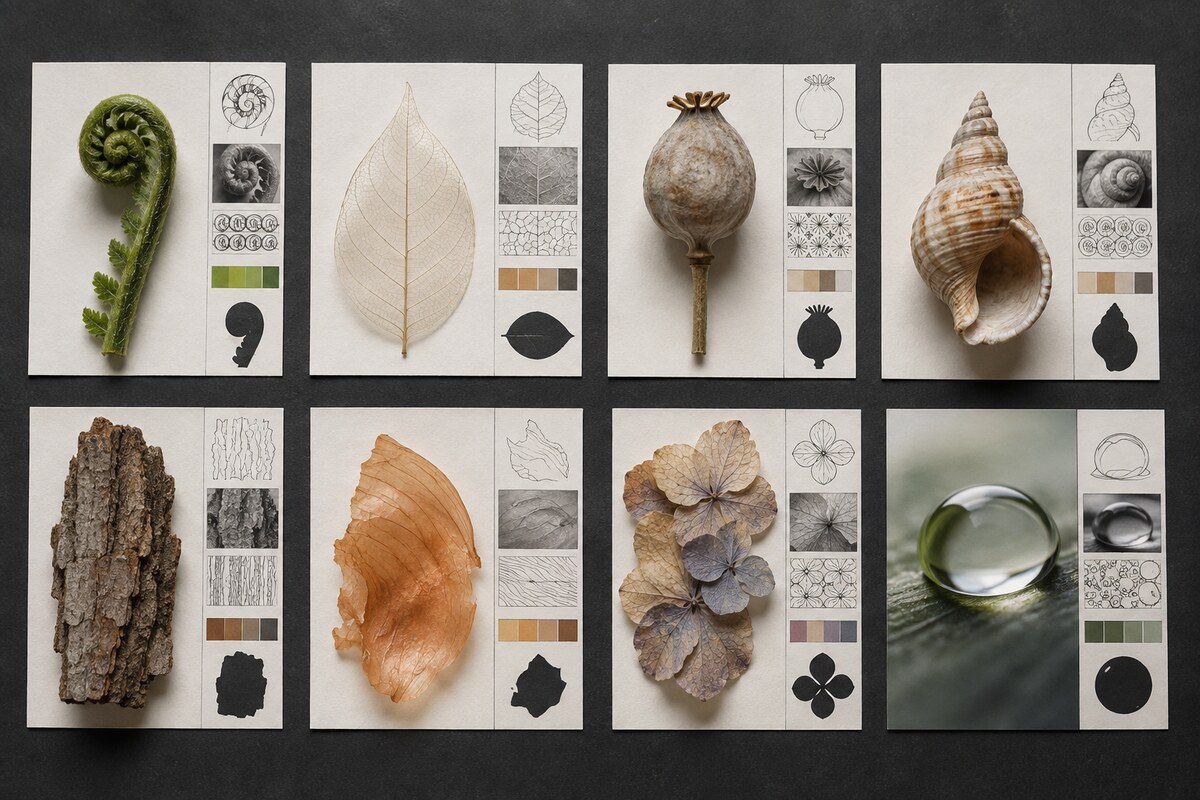
Why Natural Forms Make Such a Strong Starting Point
- They are accessible. You can begin with objects found in a garden, park, kitchen, shoreline or local landscape.
- They support first-hand recording. You can draw, photograph, scan, print, cast, model and observe the same source in several ways.
- They contain strong visual language. Line, tone, texture, colour, form, pattern, rhythm and negative space are already present.
- They can lead to personal ideas. A familiar object can connect to a place, memory, environment, scientific interest or social issue.
- They work across specialisms. The same source can lead to painting, sculpture, photography, printmaking, textiles, illustration, branding, packaging or editorial design.
- They reward sustained investigation. One small form can be revisited at different scales, stages of decay, seasons, viewpoints and levels of abstraction.
Begin with First-Hand Sources
Your own sources immediately make the project more individual. Gather a small, related collection rather than downloading a random page of internet images. Photograph the objects before they change, and record where, when and why you selected them.
A useful first session
- Collect or photograph five to ten related natural forms safely and responsibly.
- Place each object on light and dark backgrounds.
- Photograph the whole form, then move closer until it becomes unfamiliar.
- Change the lighting direction to reveal texture and cast shadows.
- Make one continuous-line drawing, one tonal study and one enlarged crop.
- Identify the most interesting line, surface, structure or idea.
- Write one question that could drive the next experiment.
For example: “How can I use the leaf’s branching network to suggest connection and separation?” is more useful than “My project is about leaves.” A focused question gives your project room to develop.
Artists Who Investigate Natural Forms
Choose artists because they can help you investigate a particular problem. Do not try to copy an artist’s finished style. Select one useful quality—perhaps scale, simplification, material, repetition, surface, space or relationship to place—and test it with your own sources.
Fine artists and sculptors
- Georgia O’Keeffe — Georgia O’Keeffe Museum collection: investigate enlargement, cropping, colour transitions and the way a familiar flower can become an immersive abstract form. Try enlarging one small section of your own source rather than copying an O’Keeffe flower.
- Barbara Hepworth — Tate introduction: study the relationship between solid form, openings, smooth surfaces, string and landscape. Try translating a shell, pebble or seed into a small clay form with carefully considered negative space.
- Henry Moore — Inspiration, Sculpture and Our Natural World: notice how bones, stones, shells and plants informed sculptural rhythm and human form. Build a “library of natural forms” and compare how two objects could combine.
- Peter Randall-Page — natural form and pattern: explore symmetry, growth systems, geometry, order and irregularity. Test a repeated carved, drawn or printed unit that changes gradually across a surface.
- Andy Goldsworthy — Yorkshire Sculpture Park trail: investigate place, change, time and temporary arrangements made with found natural materials. Document a sequence as wind, water, light or decay alters it.
- Angie Lewin — about the artist’s work: examine how seed heads, grasses, flints and seaweed are observed and then simplified through linocut, wood engraving, screen printing, watercolour and pattern. Make several small print tests from one plant structure.
Photographers
- Anna Atkins — cyanotypes at the V&A: investigate camera-less photography, silhouettes, translucency and scientific recording. Create photograms or cyanotypes from your own ethically collected plant material.
- Karl Blossfeldt — MoMA collection: study frontal viewpoints, neutral backgrounds, enlargement and the architectural qualities of stems and seed heads. Photograph one specimen consistently, then compare details at different scales.
- Imogen Cunningham — Getty retrospective: look at close botanical studies, tonal control and precise cropping. Use side light and shallow depth of field to make a flower, leaf or succulent feel sculptural rather than decorative.
- Edward Weston — Pepper No. 30 at SFMOMA: consider how light, viewpoint and tone can transform an everyday organic object into an ambiguous abstract form. Photograph fruit, vegetables or shells without relying on colour.
Graphic designers, illustrators and pattern designers
- William Morris — wallpaper design at the V&A: analyse how observed plants become stylised, interlocking repeat patterns. Develop a repeat from your own drawings and test how the eye moves through it.
- Lucienne Day — V&A introduction: examine how botanical shapes were abstracted into energetic modern textile patterns. Compare a recognisable drawing with progressively simplified motifs.
- Charley Harper — Inspired by Nature: investigate geometric reduction, flat colour and visual economy. Reduce an animal or plant to essential shapes while preserving the features that make it recognisable.
- Alphonse Mucha — themes at the Mucha Foundation: study how flowers, stems and seasonal forms frame figures, organise poster space and create visual rhythm. Use your own botanical studies to construct a border, frame or typographic hierarchy.
- Ernst Haeckel — Kunstformen der Natur at the Biodiversity Heritage Library: explore radial symmetry, classification, repetition and intricate marine structures. The linked historical plates are identified by the library as public domain, making them a useful reference for close analysis; your own response should still transform rather than merely reproduce them.
How to Research These Sources Purposefully
| Instead of… | Try… |
|---|---|
| Writing a long biography | Explain why one particular work is relevant to your question. |
| Copying the whole artwork | Test one process or visual decision using your own source. |
| Listing colours and shapes | Analyse how those choices affect mood, focus, rhythm, scale or meaning. |
| Researching five unrelated names | Compare two or three sources that offer different solutions to the same problem. |
| Leaving research on one page | Return to it when you select, reject and refine ideas later. |
For more help with making research influence your own decisions, read the GCSE Artist Research guide. The principle—research, respond, reflect and develop—also applies at A Level, although the investigation should be more sustained and critically independent.
From One Natural Form to a Developing Project

- Record: photograph and draw the source from several viewpoints.
- Notice: identify the most distinctive qualities—perhaps holes, veins, spiral growth, translucency or roughness.
- Select: crop one area and state why it has potential.
- Translate: turn the same quality into line, tone, print, paint, collage, relief, stitch, lens-based or digital experiments.
- Compare: place tests together and explain which best supports your intention.
- Combine: bring together compatible discoveries rather than forcing every experiment into one piece.
- Refine: improve composition, scale, technique, sequence or communication through further testing.
- Resolve: create an outcome that is clearly connected to the journey but is not simply a copy of the source.
Practical Natural Forms Starting Points
1. Seed heads and pods: enclosure, repetition and release
Photograph the same pod closed, split and emptied. Draw the negative spaces between seeds, make relief prints from repeated shapes, or develop packaging that opens in a way informed by the pod’s structure.
2. Leaf veins and roots: networks and connection
Backlight leaves, trace branching systems, enlarge junctions and compare them with maps, rivers, family connections or communication networks. Test line weight, overlays and routes through a composition.
3. Shells and spirals: growth, rhythm and protection
Photograph the inside and outside, compare smooth and damaged areas, build a tonal sequence, or use the spiral as a grid for an illustration, publication or three-dimensional form.
4. Bark, lichen and weathered surfaces: time and change
Use macro photography, graphite rubbings where appropriate, mono-print, collage, sanding and layered paint. Revisit one location over time to record changes in colour, moisture, light and decay.
5. Flowers beyond decoration: opening, ageing and fragility
Record a flower from bud to decay. Crop petals until they become abstract, photograph against unexpected backgrounds, compare saturated and reduced colour, or design a sequence in which the form gradually disappears.
6. Fruit and vegetables: interior and exterior
Compare skin, flesh, core and seeds. Use cross-sections to generate pattern, photograph one object under controlled side lighting, or design graphics based on colour extracted from the source.
7. Feathers and insect wings: strength and delicacy
Use only naturally shed or responsibly sourced material. Explore translucency, directional line, symmetry and microscopic structure through drawing, photography, print, wire, stitch or layered paper.
8. Stones, crystals and fossils: pressure, fracture and deep time
Compare a rough exterior with a polished or broken interior. Test faceted forms, limited mineral palettes, casts, relief, geometric grids or repeated photographic crops.
9. Water, ice and droplets: movement and impermanence
Control shutter speed, reflections, focus and light. Record melting, ripples or condensation as a sequence, then translate the results into transparent layers, blurred marks or animated graphics.
10. Fungi and lichen: communities and hidden systems
Photograph without disturbing the habitat. Compare clustered growth, subtle colour, underside structures and the relationship between organism and surface. This can lead towards themes of cooperation, dependence or unseen networks.
Developing Natural Forms in Different Specialisms
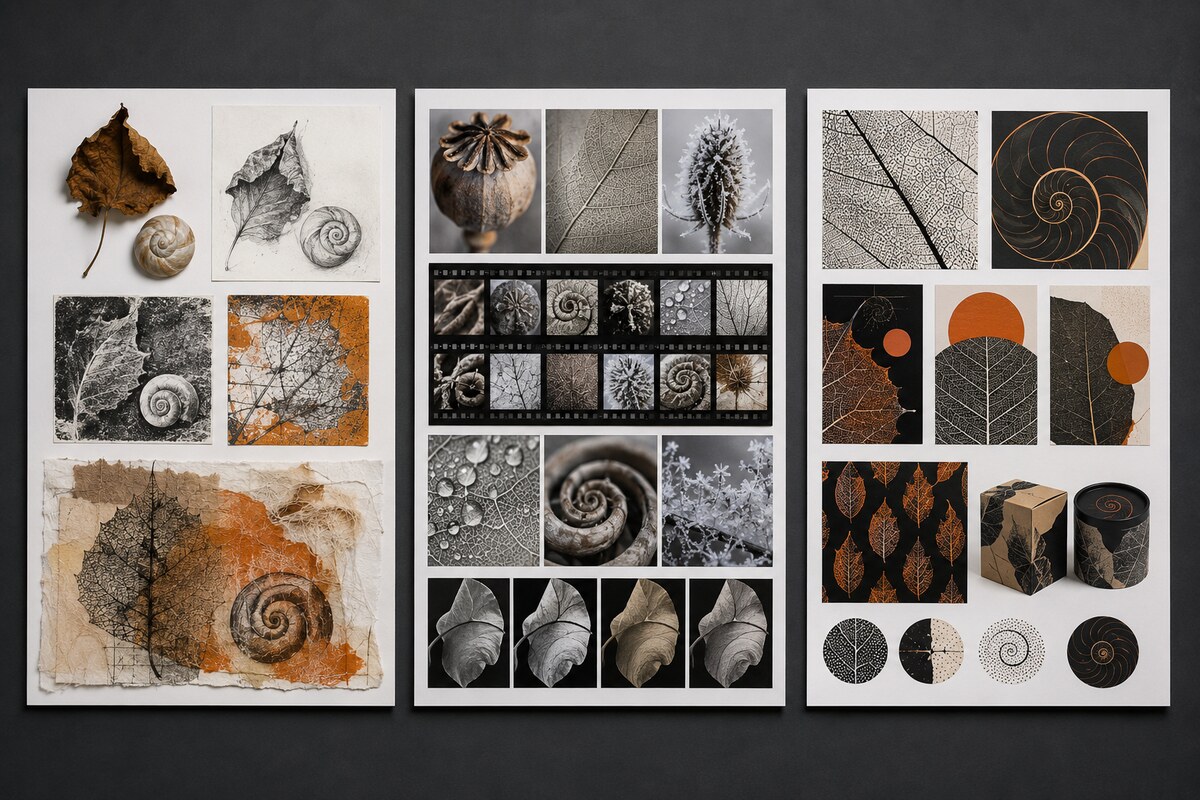
Fine Art
- Move between accurate observation and purposeful abstraction.
- Test drawing, painting, print, collage, sculpture, installation and mixed media.
- Allow material qualities to connect to meaning: fragile paper for decay, carved stone for permanence or translucent layers for hidden structures.
- Vary scale so that a tiny detail can become immersive.
Photography
- Plan an initial shoot, review contact sheets and identify what requires a targeted reshoot.
- Control viewpoint, background, depth of field, lighting, exposure and timing.
- Compare documentary, scientific, abstract and constructed approaches.
- Develop a sequence rather than relying on one successful image.
- Use editing to strengthen an intention, not to rescue weak source photographs.
Graphic Communication
- Translate original drawings and photographs into symbols, motifs, textures and grids.
- Test visual hierarchy, legibility, audience and purpose alongside surface pattern.
- Develop posters, editorial pages, packaging, identity, information graphics or campaigns from one coherent source set.
- Compare handmade, printed and digital processes rather than moving immediately to a polished computer outcome.
- Prototype the design in its intended context and refine it after testing.
The Composition in Art guide will help you make stronger decisions about cropping, focal points, balance and visual hierarchy as these ideas develop.
GCSE and A Level: What Should Be Different?
The underlying creative process is shared, but an A Level investigation should normally be more sustained, independent, critically informed and conceptually ambitious. This does not mean that every A Level page needs more writing. It means that the student’s decisions should show greater depth and ownership.
| GCSE | A Level |
|---|---|
| A clear theme or question supported by relevant first-hand sources | A more focused line of enquiry developed through sustained and independent research |
| Relevant artist investigation with practical responses | More critical comparison of contextual sources, ideas and methods |
| A purposeful range of material or photographic tests | Greater depth, control and risk-taking within carefully selected processes |
| Annotations that explain choices and next steps | More precise evaluation of intention, context, meaning and development |
| A personal outcome visibly connected to the journey | A more resolved and conceptually convincing body of work or outcome |
A small, closely observed seed head can support excellent work at either level. The difference lies in the depth of investigation, quality of judgement and independence of development—not in choosing a more complicated object.
How a Natural Forms Project Can Address AO1–AO4
- AO1 — Develop ideas: investigate your natural source and relevant artists, photographers or designers; analyse what you learn; and allow it to change your thinking. Read GCSE Art AO1 Explained or A Level Art AO1 Explained.
- AO2 — Experiment and refine: test media, processes, viewpoints, lighting, scale, colour and composition; compare results; and improve the selected direction. Read GCSE Art AO2 Explained or A Level Art AO2 Explained.
- AO3 — Record: create purposeful drawings, photographs, samples, notes and observations that remain relevant to your intentions. Read GCSE Art AO3 Explained or A Level Art AO3 Explained.
- AO4 — Present: select and combine your strongest discoveries in a personal and meaningful response that realises your intention. Read GCSE Art AO4 Explained or A Level Art AO4 Explained.
The objectives should not become four separate chapters. A natural-form photograph recorded for AO3 may lead to an artist investigation in AO1, a print experiment in AO2 and a selected visual quality in AO4.
Useful Annotation for a Natural Forms Project
Weak annotation
I drew a shell and used pencil. I like the spiral and think it looks effective.
Stronger annotation
I enlarged the shell’s central spiral because the repeated curve creates a stronger sense of movement than the whole outline. The graphite study recorded tone accurately, but the edge remained too descriptive. Next I will simplify the spiral into three weights of line and test whether overlapping it with my water-ripple photograph creates a more personal image of growth and movement.
Useful annotations identify what you selected, what happened, what the result communicates, what was less successful and what you will do next. They make your decision-making visible.
Common Mistakes to Avoid
- Using only internet images: this limits personal ownership and first-hand observation.
- Choosing “flowers” as the entire idea: narrow the enquiry to scale, fragility, repetition, change, enclosure or another meaningful focus.
- Copying a famous artist: use contextual research to learn, test and transform.
- Making unrelated experiments: each test should answer a question or respond to an earlier discovery.
- Keeping every result: selection and rejection are evidence of judgement.
- Decorating sketchbook pages with leaves: presentation should clarify development, not replace it.
- Deciding the final piece too early: allow the outcome to emerge from your strongest evidence.
- Ignoring meaning: strong visual qualities become more convincing when they connect to an intention, experience, place, audience or question.
Project Titles and Questions You Could Adapt
- Hidden Geometry
- Growth and Constraint
- Fragile Structures
- Protection and Exposure
- Networks Beneath the Surface
- Natural Architecture
- Order and Irregularity
- From Growth to Decay
- Microscopic Worlds
- Traces of Time
- Collected from One Place
- What Nature Repeats
These are prompts, not finished intentions. Personalise one by connecting it to your own sources. “Fragile Structures” could become an investigation of dried hydrangeas collected from a family garden; “Networks Beneath the Surface” might begin with roots exposed beside a local footpath.
Copyright, Ethics and Responsible Collecting
- Make your own photographs and recordings wherever possible.
- Credit every artist, artwork and website you research.
- Do not reproduce another artist’s image as your own outcome.
- Check the stated rights before placing museum or website imagery in published work.
- Use public-domain and open-access collections only within the terms stated by the source.
- Do not remove protected plants, disturb nests or habitats, or collect living creatures.
- Prefer fallen, shed, discarded or common materials, and photograph sensitive forms in place.
- Record temporary land art carefully and leave the location safe.
The images supplied with this guide were created specifically to demonstrate original project development. They do not reproduce the work of any recommended artist.
Natural Forms Project Checklist
- ☐ I have a focused question rather than only a broad subject.
- ☐ My own photographs, drawings or observations are central to the project.
- ☐ I have investigated relevant artists, photographers or designers for a clear reason.
- ☐ My practical responses apply what I learned without copying a finished style.
- ☐ I have explored scale, crop, viewpoint, structure, surface and negative space.
- ☐ My experiments connect to one another and become more purposeful.
- ☐ I have compared results and explained selections and rejections.
- ☐ My annotations identify specific next steps.
- ☐ My work becomes more personal as it develops.
- ☐ The final response grows convincingly from the project journey.
Frequently Asked Questions
Are natural forms too common as an Art project theme?
No. A familiar theme becomes predictable only when the sources, artists and responses are generic. Your own collection, a focused question and purposeful development can make natural forms highly personal and ambitious.
Do I have to draw flowers realistically?
No. Accurate observation can help you understand a form, but you can then crop, simplify, abstract, photograph, print, construct or translate it into another visual language. The process should match your intention.
How many artists should I investigate?
There is no universal number. A small range of closely relevant sources used throughout the project is stronger than many disconnected pages. Follow any specific guidance from your teacher or exam board.
Can Photography students use found natural objects?
Yes. Control how you collect, arrange, light, crop and sequence them. Also consider photographing forms in their original environment so the project includes context and place rather than becoming only a studio still life.
Can Graphic Communication students use natural forms?
Yes. Original natural imagery can generate symbols, illustrations, patterns, textures, type treatments, grids and structural ideas. Keep audience, purpose, legibility and format visible throughout development.
What makes an A Level natural forms project more advanced?
Greater independence, sustained investigation, critical comparison, technical control and conceptual depth. The subject itself does not need to be more complicated; the thinking and development need to be more convincing.
A Final Encouragement
You do not need to know the final outcome before you begin. Start with one form that genuinely interests you, look at it more carefully than you have before, and make a small piece of work that teaches you something. Then let that discovery suggest the next step. A thoughtful sequence of connected decisions will always be more convincing than a spectacular final piece with no visible journey behind it.
Would You Like Independent Feedback?
If you are unsure whether your natural forms project is developing strongly across AO1, AO2, AO3 and AO4, a personalised review can identify what is working, where the connections are weak and which next steps could make the greatest difference.
No responses yet